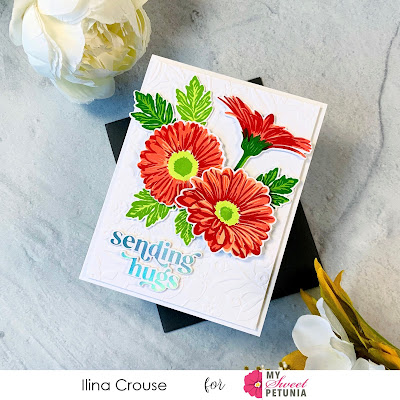
Tuesday, February 22, 2022

Masculine Birthday


Hello friends!
It's Ceal, here to share a card with you for Team Tuesday!
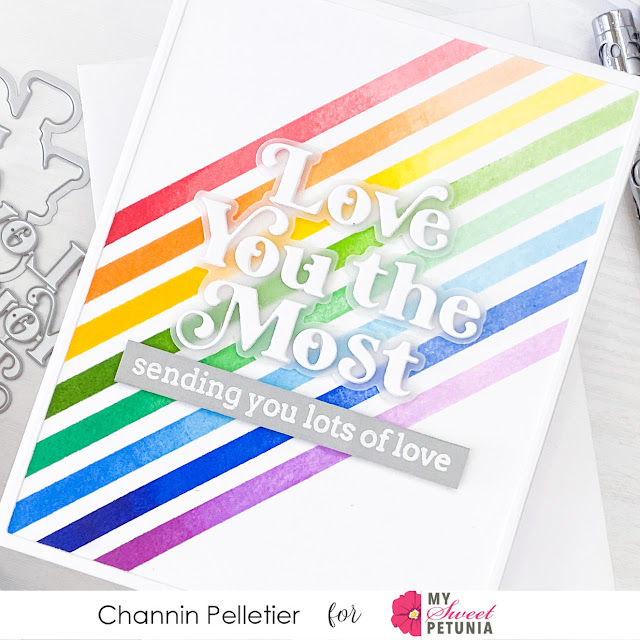
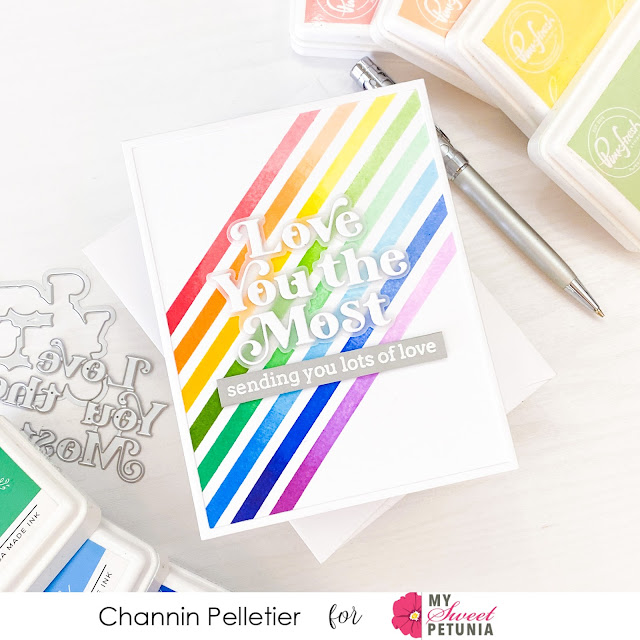
Today I'm sharing a card using some products from Ink Blot Shop and Simon Says Stamp.
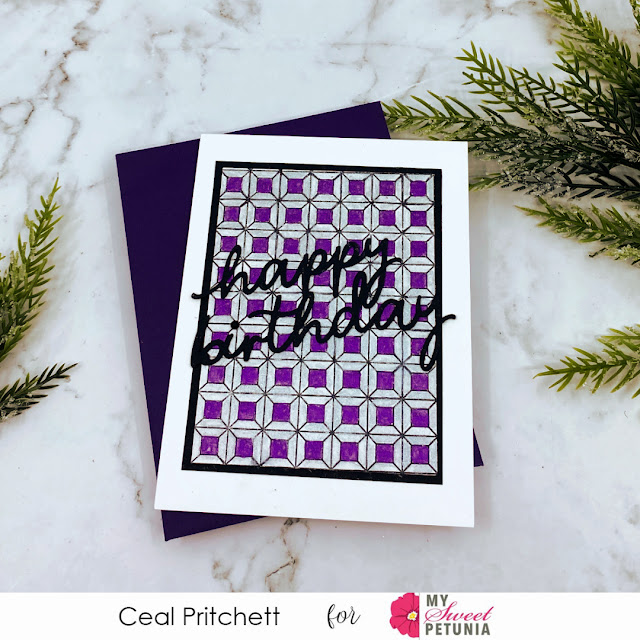
I don't know about you but masculine cards are challenging for me as you can see the purple on a masculine card, but it's all good because my son in law loves purple. 

To create this card, I started with a top folding white card base, a black panel and a watercolor panel for the focal point. 
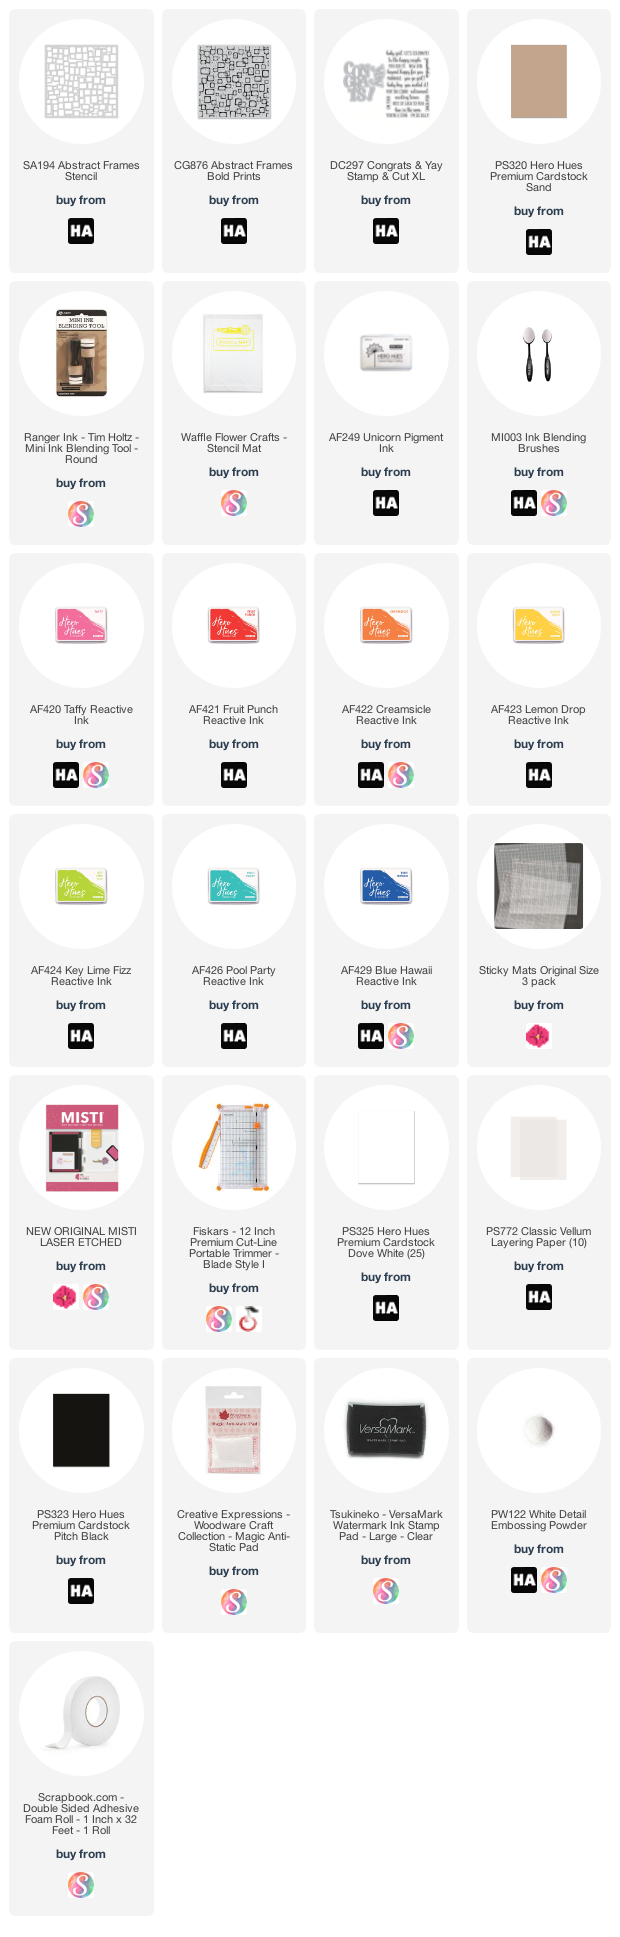
I placed the Sticky Mat inside the Original MISTI and placed the watercolor paper panel in the middle. I LOVE this sticky mat for background stamping and die cut stamping. 
 Next I stamped the Dimensional Block Background with Versafine Clair Nocturne ink and then watercolored it using some new watercolors that I got for Christmas from an Etsy seller, Iuile. They are so sparkly, it was hard to capture the true sparkle.  
To finish the card I added a die cut greeting by Simon Says Stamp. I love how it looks 3 dimensional and so will my son in law. 


Products used linked below using affiliate links 


Thursday, February 17, 2022

So Little Time & a Sticky Mat Tip

Hello, This is Angie here with a fun quilt-like card and a Sticky Mat Tip!  

Today's card features the Acetate Smooshing Technique.  This is one of my favorite ways to color a background stamp.  First, stamp distress inks on acetate.  Next, spritz with water. Lastly, tap the inky acetate onto the cardstock.  This technique is a favorite as it gives a bit more control over where the ink lands!  


Tips & Tricks:

 Background stamps can be used to create one-of-a-kind art projects.  However, sometimes it can be difficult to achieve a perfect pattern because of their large size.  This is where the Sticky Mat shines!  It holds the cardstock in place during repeated inkings for perfect coverage. 


  I have received questions regarding the stickiness of the mats.  Heavier cardstock comes off the mat with ease but light-weight cardstock might cling to the mat.  Here's my tip to easily remove even light-weight cardstock.  Since pulling the light-weight cardstock might warp or bend the paper, instead, pull the mat away from the paper!  As shown below, (with a little help from my personal handyman).  Simply add a little pressure on the mat while holding the opposite corner of the cardstock.  The paper easily pulls away!


Next,  this isn't so much a tip as just a wonderful feature of the Sticky Mat.  When using open dies, it's easy enough to stamp a sentiment or image and then die-cut. However, when the die is solid the inking needs to take place after it's been cut.  The Sticky Mat will keep the die-cut in place for precision stamping!


I hope you found today's post helpful!  Below you will find links to all the items used today!  Thanks so much for stopping by!

  Today's Featured Items:


Tuesday, February 15, 2022

Butterfly In Bloom


Hi card making friends It's Sandi here with a quick and easy card share for you.

I was digging around in my "purchased but not used" bin again and came up with this lovely Butterfly in Bloom by Catherine Pooler
I decided it was high time to get it a little inky.  This was a super fast and easy card to make and took me about 20 minutes.  Check the instructions below.

  handmade card in light and dark blue with a floral butterfly using cardmaking products from SImon Says Stamp

How to create the Butterfly in Bloom Card:

Use the Misti to stamp the butterfly image in Hero Arts Intense Black Ink.  
I used my new STICKY MATS for this and they work great. 
Once the ink is dry, color the image with Copic Markers and then cut out with the coordinating die.

  handmade card in light and dark blue with a floral butterfly using cardmaking products from Simon Says Stamp

COPIC MARKERS USED:

Purple:  V13, V15, V17 
 Blue:  B12, B24, B26 
 Teal  BG53, BG45, BG57 
 Yellow:  Y06 
 Green: YG03

Creating the Background:

Spray Pixie Spray onto the back of the Geometric Arces Stencil from Simon Says Stamp and place it over a 4 x 5-1/4 piece of white cardstock.
 (I must apologize, I didn't realize this stencil was retired until I started doing the product list, so I have linked a few others that would look just as nice)
Use blending brushes to add Simon Says Stamp's Pawsitivily Inks in Surf and Royal.
Next, once you have a nice even blend of color, remove the stencil and add a light layer of ink to get rid of the white between the ink lines. 
Attach this to a top folding A2 White Card Base. Place the card back into the Misti and stamp the sentiment in black. (I really love the font on this sentiment, don't you?) 
Finally, Use foam squares to add the butterfly and embellish with Picket Fence Studios Purple Side of a Rainbow Gem Mix.

  handmade card in light and dark blue with a floral butterfly using cardmaking products from Simon Says Stamp           

Card Making Supplies used for the Butterfly In Bloom Card:

Here are the products I used today.  Compensated affiliate links used  where available at no cost to you. When you click on a thumbnail link and shop you are supporting my website allowing me to continue bringing you new projects and videos.  Thank you.     

Thursday, February 10, 2022

Sending hugs

Hi everyone!
Ilina here today!  I am sharing a card using The Ton Stamps grouped Fresh Daisies stamp set. These grouped stamp sets are made to be used with the MISTI and you stamp bunch of images at once and then die cut them all at once. Super easy for mass producing.
Once I had stamped the daisies and leaves I die cut them using the coordinating die. It's a single die that cuts all the images at once!!! I also die cut extra from white card stock and stacked them up to add more dimension and sturdiness. 
Next I foiled sentiment using the PinkFresh Studio perfect sentiments and die cut them. These work similarly as the Grouped sets from The Ton, but they are not layered. 
Embossed a white panel and assembled my panel. To finish it off I just adhered it to a top folding white note card!


Tuesday, February 8, 2022

New Sticky Mat and Standard MISTI with Cling Stamps


Hello and welcome to the blog for Team Tuesdays. This is Susan and I am so excited today - I have my new sticky mats. I thought I would show you my set up for cling stamps. First, I should explain that I have several MISTI's. I really do use these routinely.  However, I have to say having 3 standard sized and 2 mini sized MISTI's makes my workflow so much more efficient. Iliana was very generous and set each of the design team members a package of sticky mats. The new sticky mats are laser etched and come 3 in a pack for the standard sized MISTI. The material it is made from is thicker than the mat for the Silhouette. I did use a clean tee shirt to remove some of the tac. Below are two of my standard MISTI's along with the sticky mats. I do apologize for the dirty MISTI. I am mid-release for one company and I use these all the time.


Putting the mat in is easy. For stamping clear stamps, leave the foam pad in and I slipped a piece of white grid paper under the Sticky Mat. I just did not like the look on black - I know strange. I kept the magnets in just in case and because I do use my MISTI to prep bouquets and other layouts.


The MISTI set-up for cling stamps is a bit different. Because cling stamps already have a foam base (see last picture) you need to remove the foam from the MISTI. If you do not, you won't be able to close the MISTI door with a cling stamp on it. See above picture for the basic set-up for a cling stamp. I always have one of my standard sized MISTIs set up for cling stamps. The other one is set up for cling stamps. I do the same with my mini-MISTIs.


Above you can see that I have removed the protective film from the sticky side of the mat and am laying the mat on top of the base grid. Again, I have the foam pad removed. Obviously, this was very easy to do. Excuse the purple tape, I was die cutting and my MISTI collects tape and dies! That is how much they are out on my desk. 


Above you can see my MISTI with the Sticky Mat, paper and a cling stamp ready to go. The is the Peonies Planter from Impression Obsession that I used for the card above. I shut the door and picked up the stamp. I did use a magnet just because I need the reassurance. Ok I am a bit obsessive but honestly, the sticky mat alone would have been fine. I would suggest removing some of the tac with a clean tee shirt especially if you are using 80 lb card stock. The Sticky Mat is a wonderful new tool and I highly recommend purchasing a package. 

The card was inspired by my friend Jessie Banks.

Thanks for stopping by;
Susan

Product Used: I am using compensated affiliate links at no further cost to you.


Tuesday, February 1, 2022

Rainbow with Gradation/Ombre Stamping

Hello friends!! It’s Channin here and today I’m sharing one of my favorite MISTI techniques, gradation/ombre stamping!! I use this technique to create a beautiful fading rainbow background featuring stamps and dies from Pinkfresh Studio. 


To create this card I first stamped the background using the Pop Out: Diagonal Stripes Cling Stamp Set. I started with the #6 stripe stamp and inked it up with Coral Reef ink and stamped it onto a 8 1/2” x 5 1/2” panel of white cardstock. I then partially inked up two thirds of the same stamp in Passion Fruit, a slightly darker red ink and stamped the stripe again. I then finished the stripe by partially inking and stamping the last third of the stamp in Berrylicious ink. I repeated this process for stripes 7-13 using three different inks (a light, medium, and dark) for each color of the rainbow. 


Once I had finished stamping the background I then cropped the panel down to an A2 panel and adhered it to the front of an A2 top-folding white card base. I then created a thin white rectangle frame using nesting rectangle dies and adhered the frame to the card front.


Next, I die cut a sentiment out of vellum and white cardstock using the Love You the Most Die. I then adhered the white letters onto the vellum shadow layer and then adhered the sentiment to the card front with foam adhesive. Lastly, I stamped and white heat-embossed a sentiment from the Simply Sentiments: Hello Stamp Set onto gray cardstock, trimmed the sentiment down to a stripe and adhered to the card front with foam adhesive. 


I hope you enjoyed my card! Thank you so much for stopping by!


~Channin


Supplies: