Wednesday, December 29, 2021

Christmas Greeting with Karen ReƔtegui


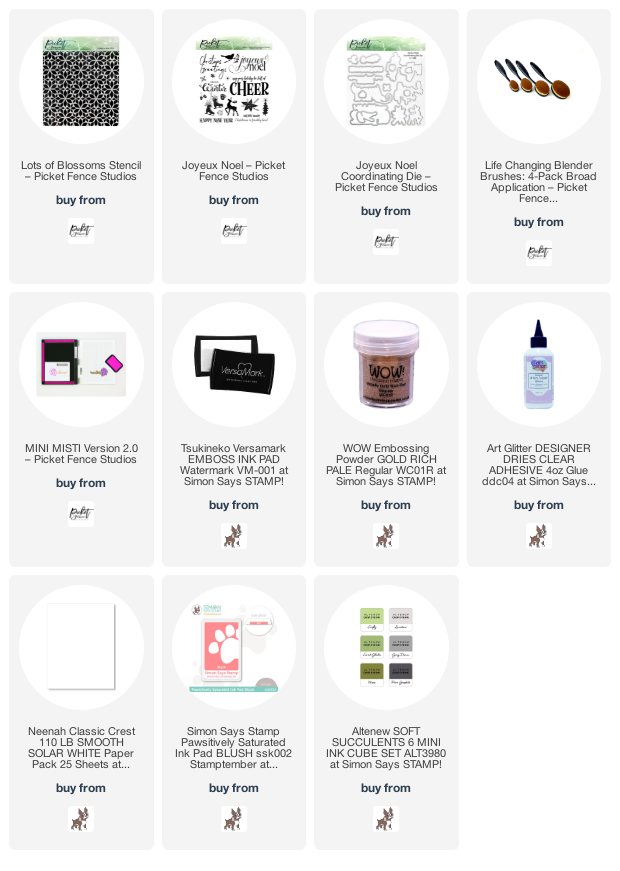
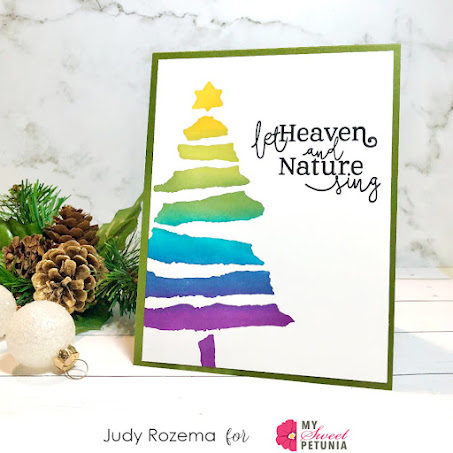
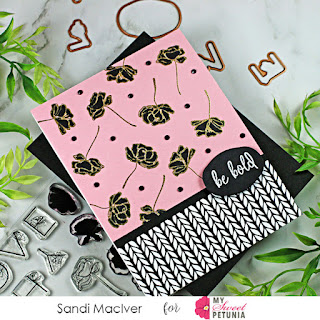
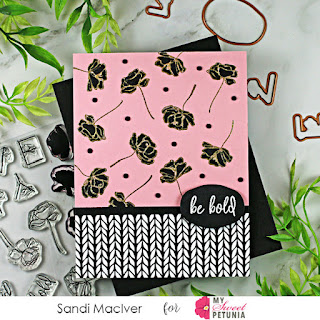
Hello friends! Today I'm sharing this set of Christmas Cards that you can easily mass produce. The products I used are the following: Joyeux Noel Stamp and Dies, Lots of Blossoms Stencil, Life Changing Blender Brushes, SSS Blush Positively Saturated Ink, Altenew Forest Glades, Gold WOW! Embossing Powder and my Mini MISTI.


Let's begin! I started by placing the Lots of Blossoms Stencil on top of an A2 panel and I applied the SSS Blush Positively Saturated Ink and Altenew Forest Glades using the Life Changing Blender Brushes.


Then, I trimmed down this panel a little bit and adhered it to a card base using glue. I changed a bit the position of each background to make each card slightly different.


Next, I placed a piece of white cardstock inside my Mini MISTI and I stamped the sentiment from Joyeux Noel Stamp using Versamark Emboss Ink, then I added Gold WOW! Embossing Powder and heat embossed it. Finally, I die cut the sentiment using the coordinating die and I placed it on top of my background. I placed the sentiment on each card as a final touch making this a very simple card design.

I hope you like this set of cards and thank you so much for stopping by. Below you will find all supplies used on these cards.


Have a wonderful day.
Your friend, Karen


Tuesday, December 28, 2021

Team Tuesday with Ceal


Hello Misti loving friends! 
It's Ceal, here. Today I am sharing a card made with the newest Turnabout. If you know me, you know that I love Turnabouts.  The Turnabout stamps were especially made for a MISTI and the best thing that I love about it is, when you are done with your turning session you could end up with tons of backgrounds just by changing your colors.  I am only showing one card but I ended up with 6 backgrounds from this one session. I am also leaving this turnabout stamp set up in one of my Mistis because I am planning on making a new years card with it as well. 

To make this card I started with a top folding white card base, a white panel and an oceanside panel for the mat. Using the MISTI 2.0 and the Celebrations Turnabout, I turned it four times inking in Marmalade, Stardust, Oceanside and Aqua Sky. 

Next I inked up the Birthday Scoops set using Oceanside and Aqua Sky. This is a two step stamp so the Misti comes in handy with it also.  After I Stamped out the Happy Birthday, I cut it out with the coordinating dies and also cut out the three hearts using the die set. 


This Post uses compensated affiliate links where possible. When you place an order after clicking one of my links, I receive a small commission at no additional cost to you. Thanks so much for shopping from my links and supporting me šŸ’™ 


Wednesday, December 22, 2021

Let Heaven and Nature Sing

It's down to the wire for mailing cards for me! I don't mind them arriving late, as long as I mail them before December 25! Today I have a fast and easy card that I love -- I am not one for making multiples, but this one I could get into mass producing.

Since it's almost Christmas, I am making this a fast and easy post for my fast and easy card! First of all, get out your MISTI! It helps not only with the stenciling (I put this in the top right corner flush with the cardstock and stencil edge), but of course, making your sentiments look sharp and crisp (VersaFine Clair Nocturne). 


Loving these elements together:
•card cased @amybeth928

Have a wonderful Christmas!
You can find more of my projects HERE.

Tuesday, December 21, 2021

Color Outside the Lines with Sandi MacIver


Hi crafty friends and welcome back.  Sandi MacIver here and today I'm playing with the Clear Stamp Set of the Month Club from Spellbinders Color Outside the Lines. 

This adorable stamp set is a two step stamping set with a selection of outline florals and then a matching fill in stamps.  Use them randomly, or create the words spelled out in the stamp set and die cut them with the coordinating dies. 

 For todays card, I did neither, haha.  I decided to use my Misti and stamp three of the floral images randomly over my pink card front and color them with my black copic marker. 


 How to create the Color Outside the Lines Card:

 Place the pink card front into the Misti and stamp the floral images across the piece in VersaMark Ink.

Cover with Gold Embossing Powder, shake off the excess and heat set. 

Color in the florals with a black Copic Marker.


 Cut a piece of Gina K Petite Patterns black and white pattern paper 1-1/2 x 4-1/4 and attach to the bottom of the card front. 

Next, cut a thin slice of black and add it above the patterned paper. 

Stamp the sentiment in VersaMark onto a scrap of black and white heat emboss it.

Finally, cut it out with the wide oval die. 

Embellish around the florals with Black Gems from Picket Fence Studios.


Card Making Supplies used for the Spellbinders Color Outside the Lines Card:

Here are the products I used today.  Compensated affiliate links used  where available at no cost to you. When you click on a thumbnail link and shop you are supporting my website allowing me to continue bringing you new projects and videos.  Thank you.


Thursday, December 16, 2021

A Chillin' Shaker

Hello everyone, today I am sharing a fun shaker card.  At first glance, this might not seem like a shaker, but it is!  This technique has been around for a few years, but I came across it in an online class recently!  I will get back to the "how-to" of the shaker but first, let's talk about how the MISTI makes stamping a joy!

I use both the New Original MISTI and/or the New Mini MISTI for every card project. First, I placed a piece of cardstock in the Original MISTI and stamped the three adorable penguins a far enough distance that I could die-cut them.  I always leave my stamps on the platform until I am completely done with making the card in case I have an issue and have to restamp.  That is one of the reasons I love having more than one MISTI.  While the image stamps are in the Original, I stamp the sentiment with the Mini MISTI.


Creating a Seamless Shaker is super easy which is why it's my new favorite technique! 
Take clear stamp packaging or flimsy acetate and cut it larger than the card front.  It should be large enough to fold over and adhere.  Decorate the card front.  Place card front face down on clear packaging.  Miter the corners of acetate.  Add double-sided tape to the back of the card front.  Remove tape backing on 3 sides.  Fold clear packaging along the card front and adhere.  This will leave one side open to fill with shaker filler. Flat sequins are ideal but as you can see my shaker is filled with both flat and curved. Seal the remaining side by folding over the packaging and adhering with the tape.  Lastly, adhere your shaker to a card base.  Easy peasy!  

One more thing before I go, check out the new MIS-T Ruler! They are sized perfectly for use with the MISTI and they come in both metric and imperial units of measure!  I am thrilled with this new tool!   


Today's design was influenced by Freshly Made Sketches #516!

Thanks so much for stopping by!

Today's Featured items:


Tuesday, December 14, 2021

Home Alone with MISTI


Hi,
This is Susan today. I am trying new things and today you get to see one of my experiments. I have used colored pencils before but seldom tried using paper specifically for colored pencils and not using gamsol. This did not come out quite like I thought it would. However, this Impression Obsession stamp is my favorite Christmas stamp, Winter House. It reminds me of our old home as well as a small part of the house featured on Home Alone. 

I removed the foam pad from my MISTI 2.0 because this is a cling stamp. I stamped it with Versafine Onyx Black onto Mitientes paper. It is important to use a MISTI tool when stamping onto paper intended for pencils and colored pencils. These papers are lightly textured and you may need to stamp two or three times to get a crisp image. I then used my Polychromos pencils and spent part of Home Alone 1 and part of a Hallmark Christmas Movie coloring in this image. I have colored it so many times that it is very relaxing to color it. Time flies along with the snow in the image. 

Thanks for stopping by;
Susan