Thursday, February 25, 2021

Bunny Blessings Slimline Card

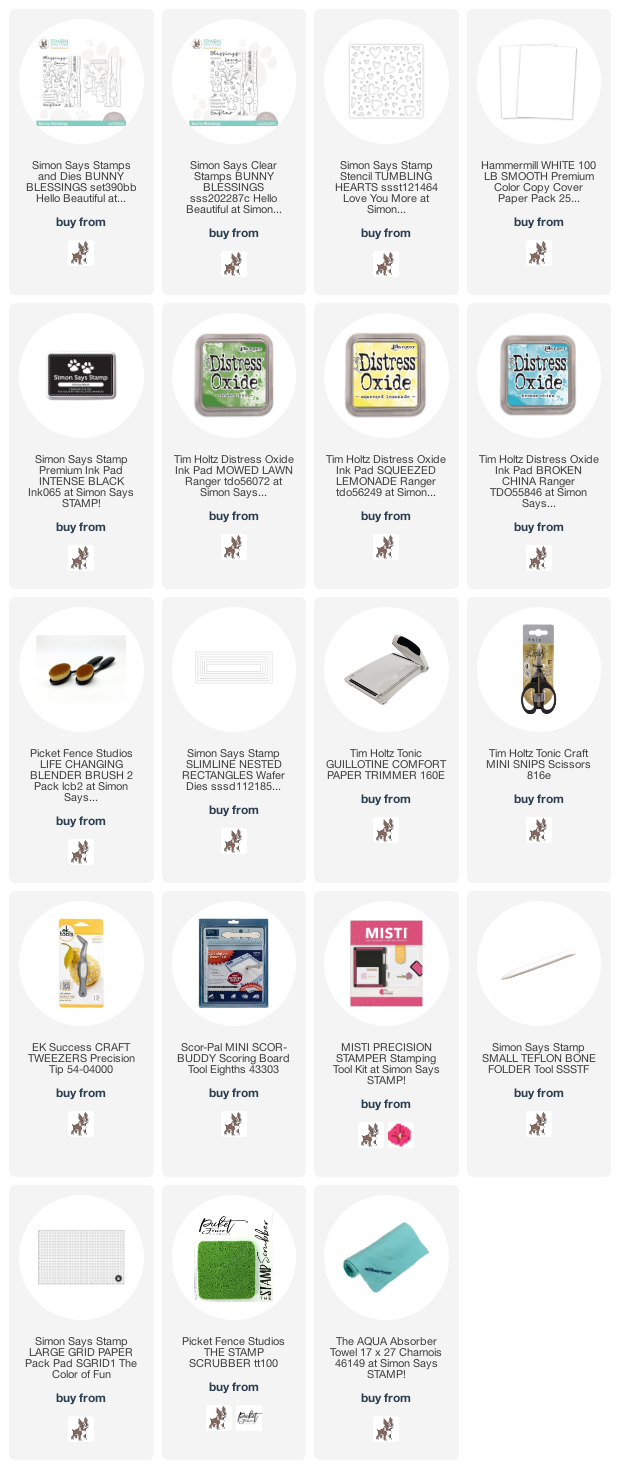
 Hey cardies, welcome back.  Sandi here and I have a fun Bunny Blessings Slimline Card to share with you today.

Simon Says Stamp had a new release yesterday and I can't stop playing with this new Bunny Blessings stamp set.  SO much fun to color.


How to Create the Bunny Blessings Slimline Card:

  • Use the Misti to stamp the images onto Hammermill card stock with Copic Friendly Black Ink.
  • Color the images with copic markers, (listed below)
  • Cut the background @ 3-1/2 x 8-1/2 and use blending brushes to add Squeezed Lemonade and Broken China Distress Oxide Inks.  Just a light coating
  • Cover the background with the Simon Says Stamp Tumbled Hearts stencil and add a second layer of the Distress Oxide Inks.
  • Place another 3 x 4 piece of white card into the Misti and stamp the grass image twice across the top
  • Color with Copic Markers and cut out the grass image from the top (leaving the bottom intact)
  • Adhere to the bottom front of the card front and trim from the back.
  • Place the card front back into the Misti and dry fit all the pieces to the background.  Stamp the sentiment in black in.
  • Cut a card base at 8 x 9 and score at 4.  
  • Attach the card front to the card base.
  • Add your art pieces with Foam Squares to heighten them slightly

COPIC COLORING
Bunnies:  C00, C0, C1, C2, C3, C4, C5, C6 (or use every second color)
Pinks:  R30, RV10, RV63, RV55, RV17
Greens:  YG21, YG23, YG17
Turquoise:  BG11, BG13, BG49

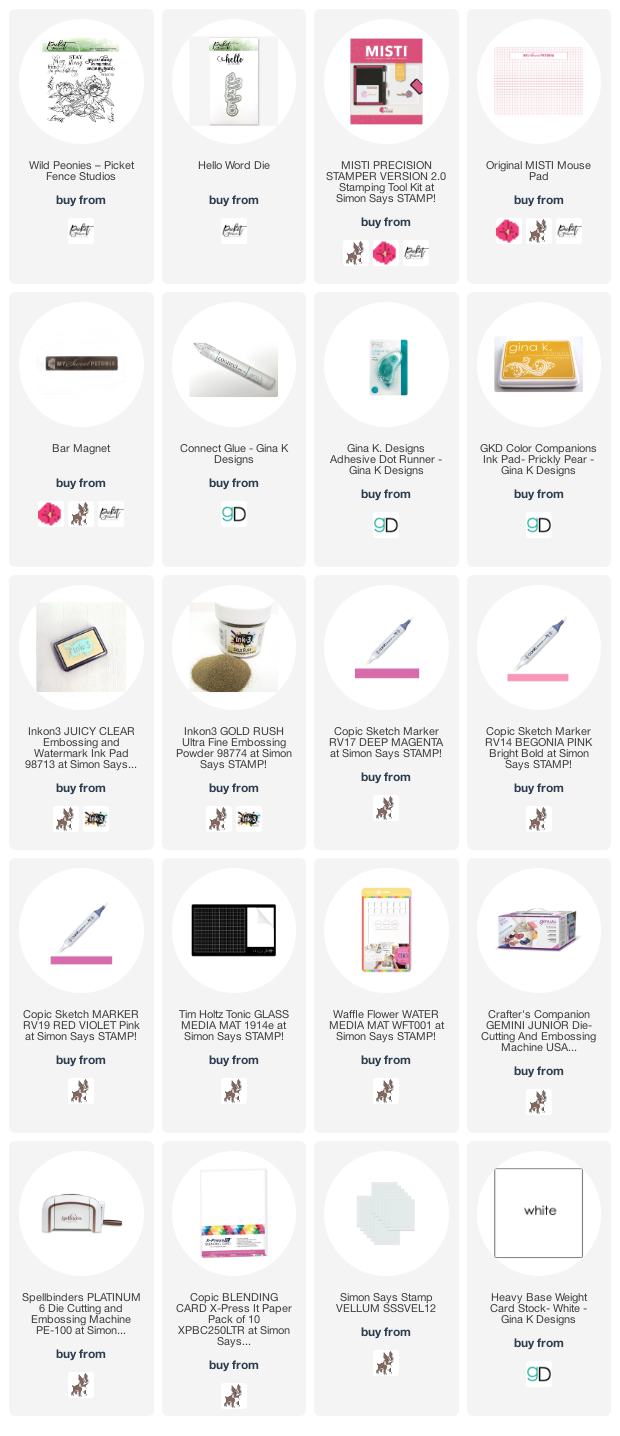
If you don't have an hour to create a card like the above Slimline, I have a quick alternative for you.


BLESSINGS BUNNY CARD:
Same steps, same colors, but in A2 size.
Card front is 3-7/8 x 5-1/8 Hammermill 100# White
Mat:  Audrey Blue from Simon Says Stamp 4 x 5-1/4
Card base:  401/4 x 11, score and fold at 5-1/2 - Hammermill 100# white
Distress Oxide Ink in Mowed Lawn used for the subtle background
color and cut out one bunny, the butterfly, 3 eggs and a flower
Place the card front into the Misti to line up and stamp the sentiment across the top in Audrey Blue Ink
Attach the art pieces with small pieces of foam tape.

There are lots of sentiments included in this adorable stamp set for year round use.

That's it for me today, hope you enjoyed the cards.  

The supplies I used are listed below for you.  Affiliate links used where possible at no additional cost to you, and I thank you for your support.


Tuesday, February 23, 2021

Team Tuesday with Ceal


\

Hey Y'all!
It's Ceal, here. Today I am sharing a card where the MISTI is a must have. 
Today I am sharing a card that uses a technique that I learned a few years ago when I took Kathy Racoosin's class at Junkiefest. 


To create this card, I started with a white top folding card base and a white express it panel for the copic coloring. 
I placed the stamp in the Original MISTI and stamped the floral image from the Wild Peonies set by Picket Fence Studios in Prickly Pear ink by Gina K Designs. I left the stamp in the MISTI because I will need to stamp again after I finish the coloring.
I colored my entire panel except the flowers with Copic markers in RV14, RV17 and RV19 to get the ombre' effect. 
Next using a small piece of terry cloth and some Copic colorless blender I picked up some of the ink all over the panel to get the texture, then placed the panel back in the misti and over stamped the peonies with embossing ink and embossed them with gold powder. 
To finish the card I cut the Hello out of gold foil paper and placed it on a vellum backing and adhered to the front of the card. 


Supplies: Compensated links at no extra cost to you

Friday, February 19, 2021

Hello with The Ton Stamps

Hi everyone!Ilina here. Today I am sharing a slimline card using The Ton Eucalyptus grouped stamping set along with the Slimline Quilted Cover plate. 
The Ton's group stamping sets are basically designed to work with the MISTI and you stamp all elements at once. They have guide marks too, so it takes the guess work out of the layering. You will just need to line up those guides when positioning the layers and you are good to go. Also the coordinating dies cut all elements at once! Makes so easy to mass produce.
To make the card I used inks from Pink Fresh Studio: Mint, Meadow and Emerald City. Once I stamped the images I die cut them. 
Stamped sentiment on black card stock (the sentiment is part of the same stamp set) and embossed in white. Trimmed to size. 
Die cut the slimline cover plate from white card stock and assembled my card! 


Tuesday, February 9, 2021

Quick and Easy Florals with Susan


Hello! 

This card and the inspiration for it were from Facebook Lives by Dawn Woleslagle of WPlus 9 Designs. You can find her group here.  This card has lots of layers as I was CASEing a card by Dawn. Most importantly, what I learned during that class was another way to make a lot of die cut florals quickly.

I first made a 6x6 panel of ink smooshing with various similarly colored Distress Oxides or Hero Arts Reactive Inks. I used Vicki Bouton's Foundations paper for all of these panels. I was careful to leave some areas of the paper white or with little to no ink. 


Above you can see that I laid out each of the florals I was using on my new MISTI. I stamped all the florals and sentiments in Versafine Onyx Black. You absolutely need a MISTI for this production line of florals as I call it. Also note that the large floral is over top both a colored area and a white area.


I also stamped the same images onto a sheet of plain Foundations paper. Below is an example of the finished florals. 


It was amazing how many florals I could make in one stamping and die cutting session. With the MISTI I was blazing along with this technique. In the picture below you can see that I have even have enough left over to make 2 additional cards.


Thanks for stopping by;
Susan

Products Used: I am using compensated affiliate links at no further cost to you. My Sweet Petunia gifted the new standard sized MISTI. I purchased the remaining supplies myself.


Tuesday, February 2, 2021

Pretty Postage Card with Channin


Hello friends! It's Channin here and today I have sweet little valentine share! I used the new Pretty Postage Stamp Set from Honey Bee Stamps to create this card. 


To create this card I first stamped the main image from the Pretty Postage Stamp Set in Memento Tuxedo Black onto white cardstock. 


I then copic colored the image and then die cut it out with the matching die. 

Red Flowers: (inside) R24, R35, R29, R46

    (outside) R35, R29, R46, R59

Flower Centers: Y11 & Y15

Mint Green: YG11 & YG41

Green: G43 & YG67

Envelope: R00, R20, R22


Next I die cut an 4 1/8” x 5 3/8” panel of light pink cardstock with the Quilted A2 Cover Plate Die. I then adhered the panel to an A2 top-folding white card base. Next, I adhered my image with foam adhesive. Lastly, I stamped, white heat-embossed, and die cut my sentiment and then adhered it to my card front with foam adhesive. 


I hope you enjoyed my card! Thank you so much for stopping by!


~Channin


Supplies: