Friday, September 28, 2018

Stash Busting


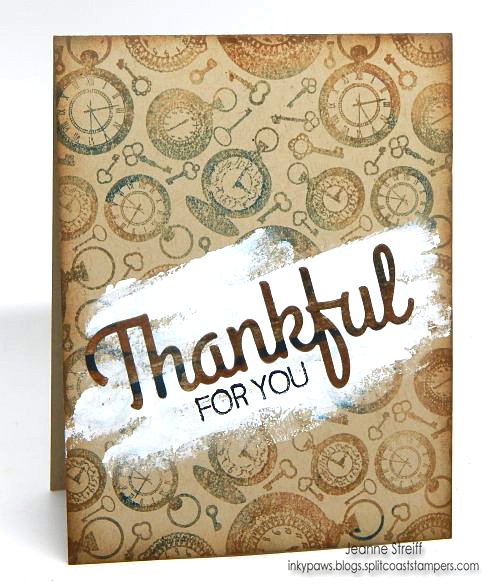
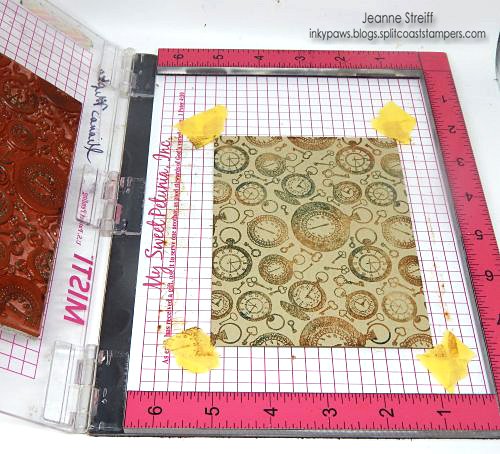
I have a drawer full of 6 x 6 pattern paper; I need to use up some paper so I can buy more paper.  Seems crazy but I know you are in the same boat as me.  So for today's cards I pulled out some really old pattern paper, Lawn Fawn.  I admit that the paper is so cute that I wanted to save it; however,  Lawn Fawn has new cute paper every year so there is no point saving it anymore.

The card above uses the Let's Bokeh in the Snow pattern paper.  I did find one store that still had it, but chances are that you have it too.  I did use the new Hero Arts Christmas Word die and Snowflake Edge die.   The pearl glitter paper is from Concord & 9th and the red glitter is from my local Hobby Lobby.  


This cute card above was made using an even older paper pad from Lawn Fawn Snow Day.  Unfortunately, I did not find any store that still has it.  However, you can build any scene you want in the frame with any stamp set.   Sorry about that but I just had to show you the cuteness that came out of the pattern paper.

The video below only shows the first card.  I am working on another set of Stash Busting cards so stay tuned for that.     Let me know in the comments below if you like these find of videos.

Have a great day!


Affiliate links to supplies used:


Tuesday, September 25, 2018

Team Tuesday with Stephanie

Today I'm sharing one of my favorite MISTI Techniques. I like to stamp multiple times with various colors of ink to *paint* a large image ... today I'm using the new Autumn Blessings image designed by Janine Tinklenburg from Mitten State Stamps exclusively for Technique Junkies.

The current Technique Junkies Challenge is to create using *HOT* Colors.  My favorite hot colors are found in the palette of Autumn Leaves ... my favorite time of the year.  


I started by inking the edges of the tree trunk with VersaFine Clair Pinecone Ink.


I use watercolor paper because it works well for the multiple layers of stamping, but any cardstock will work.  

To get a similar effect prior to the MISTI, I had to color the entire stamp with ink or markers (and then huff and huff to make sure all of the inks were wet enough to stamp).  

Being able to layer on each color with multiple inkings with my MISTI makes it so much easier.


Next I used VersaFine Clair Acorn ink to color the inside of the tree trunk.


I started with the lighter *hot* colors to *paint* my leaves.


First I stamped with Cheerful and then with Verdant.


Next I added lots of Tulip Red including the sentiment.


I finished with Summertime Orange making sure I got the entire frame inked as well as that tiny leaf hiding up there between the tree trunks.


While I had my stamp & MISTI set-up, I went ahead and created a second card.  


For this one I used one of the Browns on the sentiment and a little more brown ink on the frame.


I just love this stamp ... it reminds me so much of the Autumns growing-up in the Missouri Ozarks.

Remember, you can use my Discount Code TJ10Stephanie for 10% off anything in the store (the store is also carrying the wonderful Versafine Clair Inks that I used for my projects).


Stephanie Severin

Friday, September 21, 2018

Mega Succulent Sympathy Card

It is a sad occasion when we have to make sympathy cards.  I try and make it extra special so that the recipient can feel my love and prayers during their difficult time.

For this card I kept it simple and stamped the Altenew Mega Succulent and heat embossed it with Brutus Monroe Icicle embossing powder.  I decided to do ink blending with my fabulous Picket Fence Studios Life Changing Blender Brushes.  For the ink blending I used Gina K inks in Red Velvet, Plum Punch and Blue Denim.  I can't tell you enough how awesome these brushes are.  I actually get a little sad when I am done using them.


I used MFT Brush Stroke Expressions for the sentiment.  I thought I was recording that part of the video but the footage was not there.  So I will explain that.  Because the Mega Succulent is clear embossed, the image is slick.  Any ink on the clear embossing will smear or bead up.  By using Brutus Monroe Raven embossing powder it will seal in the ink.  

I used various jewels for embellishments and then for a final touch, I sprayed the card panel with Sheer Shimmer Mist

Thanks so much for stopping buy.  Be sure to watch the video and hit the like and subscribe buttons.  Don't forget to leave a comment and let me know what your favorite ink combinations are.  


Affiliate links to supplies used:

Tuesday, September 18, 2018

Team Tuesday with Chris

Good morning! 

It's Chris here with a monochromatic card and video to share.  I love to challenge myself to working in grayscale every once in awhile.  It great coloring practice, and forces me to focus on contrast only without the hassle of choosing colors.   


I've used my Original Misti to stamp this floral from Hero Arts,  Hero Floral Magnolia, with Gina K. Designs' Amalgam ink onto Strathmore's 400 Series Toned Gray paper.  While my paper and stamp was still in place, I stamped a second time to give a dark, crisp image for me to color.

For my coloring medium, I have limited myself to only 8 Faber Castell Polychromos pencils:  the warm grays I-VI, black and white pencils.  I first began to very lightly color in the cast shadows of the petal with gray VI.  This light coloring gives me the flexibility to start to create the shape of the flower, and yet the dark gray is colored faintly enough that I could still erase away the coloring should I want to change my mind.  

I built up more of the petal shapes using the gray IV and V before adding the deepest contrast areas with the black pencil.  I then worked toward the lighter gray, blending the colors, continuing to create the visual depth of each of the petals and leaves.

The last pencils to be used were the white and gray I.  Those are my lightest highlights and can create that dramatic contrast on the gray paper.

Here is the short coloring video:


I used my Rototrim paper trimmer to very carefully cut my panel.  I carefully cut from the corners just to the leaves, then used a scissor to free the leaves so they can extend over my black and white mats.  A quick cut with a craft knife and ruler between the leaves that I wanted to remain extended, completed the rectangle panel.

Thanks for joining me today, and I hope you enjoyed the short coloring tutorial!

Happy stamping!

Tuesday, September 11, 2018

Team Tuesday with Jeanne Streiff

Happy Tuesday!

I'm on the tail end of a long weekend with some dear friends and I can't think of a better phrase than "thankful for you" right now.  We get together a couple times a year and it's such a soul recharge to be among a great group of friends for a few days.


I used Impression Obsession CC163 Cover-a-Card Watches & Keys, MC656 Thankful clear set &
DIE388-Thankful die along with my MISTI for today’s project (links below).
Thankful Jeanne_Streiff
Since this was a big background stamp I used tape on the corners of my card to keep it in place
 on my MISTI tool and then moved the tape and restamped to fill in the places I missed the first 
stamping. I inked the stamp with Chocolate ink and then added some blue ink (Peacock and Seafoam) with a blending tool before stamping my background (CC163 Cover-a-Card Watches & Keys). 
I inked and stamped a couple times to get a nice blend in the colors.

1 Thankful Jeanne_Streiff
I added a few swipes of white acrylic paint (with my finger) along the card.
Set aside and let dry completely.

5 Thankful Jeanne_Streiff
I created a panel by swiping Chocolate and Peacock inks onto cardstock.3 Thankful Jeanne_Streiff
I die cut the DIE388-Thankful die with my Big Shot.

4 Thankful Jeanne_Streiff
To finish my card I stamped “for you” and then added the Thankful die cut.6 Thankful Jeanne_Streiff
Supplies used:

Have a great day!
    Jeanne

Tuesday, September 4, 2018

Team Tuesday with Ceal


Hi there!
It's Ceal, here to share with you today. 
ATC coins are the newest rage and the MISTI can help you get yours made lickety split. 
In case you d not know what they are, it's the sane as an Artist Trading Card but instead it's a 2 1/2 inch circle and called an Artist Trading Coin. These are super fun to make and addicting. 
To make my coin, I cut out multiple circles because they are for a swap and I needed quite a few. I placed the circle in the Mini MISTI and then stamped this cute ghost by Picket Fence studios using Memento ink, next I masked it off and stamped some stars using Lawn Fawn Glow in the Dark embossing powder and then sponged the background with distress oxide inks. I removed the mask and colored him up with Copic markers. To finish the coin I added the boo greeting also by Picket Fence Studios 


Another way you can use the coins is by adding them to a card front