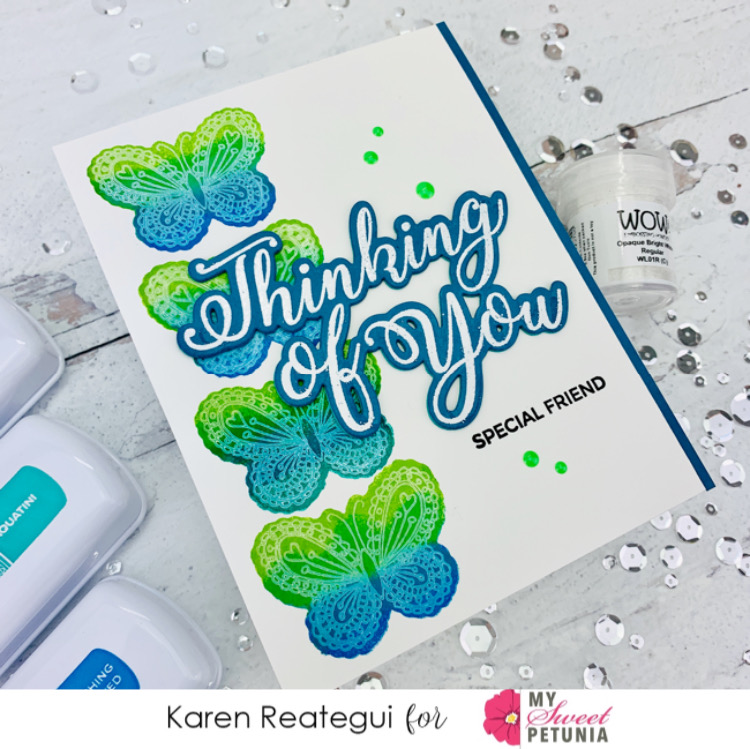
Thursday, December 31, 2020

Botanical Turning With Ceal


Hey Y'all!
It's Ceal here for Team Thursday sharing a couple cards with you using the Botanicals Turnabout by Concord & 9th.  
The turnabouts were made specifically for the MISTI and I love using them. I have one of my Original Misiti's set up as my Turnabout Misti. I keep the jig in it at all times so I know where it is. 
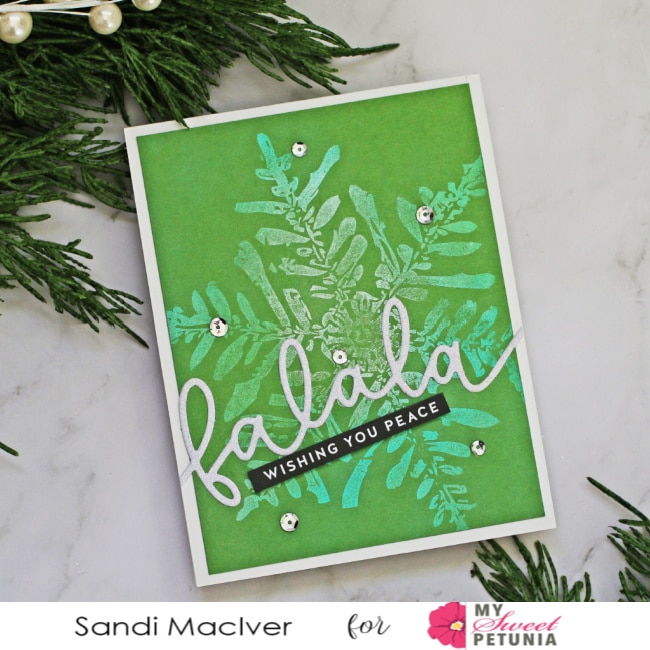
To create these cards I started with a white panel cut to 4.5 x 5.5 this size fits in the allocated slots on the jig.  I then lined up the stamp on the placement sheet and lined up the x on the placement sheet with the x on the jig. I tucked the jig in the corner of the Misti and then added my panel on with a little removable adhesive. 
Next I inked up the stamped the image rotating after each color.  


I stamped several  backgrounds for three of them I used four different colors, one uses three different colors and then one uses the 2021 Pantone colors Grey and Yellow.
I only used two of backgrounds for my cards, I will use the rest of them later so be sure to follow me either on my blog, Simply Beautiful or Instagram as Cealp to see how I use them. 


Below you will find links to the products used. Click the picture to start shopping. Compensated Affiliate links are used at no additional cost to you. Your support helps me to keep bringing you new projects and I appreciate that so much!  

Thank you!


Tuesday, December 29, 2020

Ink Repeating with Karen Reategui


Hi friends! Today I’m sharing this card over My Sweet Petunia Blog. I’m using Layering Flutterbies Stamp & Die Set from Julie Hickey Designs and for my sentiment I have Signature Thinking of You Stamp & Die Set also by Julie Hickey Designs.

For this card I have a mix of a ink repeating technique and blending inks with mini daubers. The sponge from the daubers also gave some texture to the blending which is awesome. The inks used on this card are from Catherine Pooler Designs.


Let’s begin! I started by placing a silhouette of one of the butterflies on an A2 panel. I begun stamping from bottom to top. Then, using a dauber I applied three different inks to the silhouette stamp. The inks from Catherine Pooler Designs that I used are Aquatini, Lime Rickey and Something Borrowed.


I stamped each butterfly silhouette and repeated the process of ink blending each time. Next, I stamped the outline of the corresponding butterfly using white ink.


Additionally, I die cut the Signature Thinking of You Die and placed the negative part in the MISTI. I put the die cut inside the negative part and stamped the Signature Thinking of You Stamp and heat embossed it with WOW! Opaque Bright White Embossing Powder.


I die cut the Signature Thinking of You Die two more times and glued them behind the white heat embossed die cut. Next, I stamped the sentiment “Special Friend” from Friendship Flower Stamp set from Julie Hickey Designs.


Finally, I trimmed just a bit one side of this panel and then I added a white folded notecard at the back using glue. Last, I placed the white heat embossed die cut on top of the background and I also adhered a strip of teal cardstock at one side and this card was finished. 

Thank you so much for stopping by and have a fabulous day! 

Your friend,

Karen 


Tuesday, December 22, 2020

Metallic snowflakes with perfect Pearls


Hey stamping friends welcome back. It's Sandi MacIver here and  today I'm playing with Metallic Snowflakes with Perfect Pearls.

 I have been cleaning and sorting all my craft supplies getting ready to pack for our move and I found my PERFECT PEARLS.  

I've probably had them for 20 years  and I thought "how fun - let's give them another go".  They are still available, inexpensive and as you will see in the video below, provide a HUGE impact.  I also created 5 more holiday cards in a matter of minutes using the Misti to quickly and easily stamp the image.


  Metallic Snowflakes with Perfect Pearls

What are Perfect Pearls:

They are small contains containing tiny pieces of mica that have been ground into pigment powders.    You get a beautiful metallic look when using them.  

They have a built in resin and binder allowing you to use them wet or dry and for today's cards, I'm using the dry method. 

 As you can see I'm once again playing with the Colorado Craft Company's Wishes Snowflake, I just can't get enough of this magnificent thing, and I love how I can make quick, flat and beautiful cards with it. 

 Here is my Video walking you through the steps to creating these cards and there are sample images below for you too. 


 For Mass Producing these cards I once again used my Misti Stamping Tool.  When I placed the first piece of black cardstock into the Misti, I drew a line around the outside corners, for placement of future pieces, so I didn't have to reposition the stamp each time.

  Metallic Snowflakes with Perfect Pearls purple

There are two kinds of ink you can use for stamping the image and applying the perfect pearls.  

Perfect Medium which was originally created by Ranger to use with these pigments, and VERSMARK (the one you use for heat embossing), also works, but make sure it's really inky.  

You will see on my green card in the video, that mine wasn't, and the pearls don't stand out as much because of it.


  Metallic Snowflakes with Perfect Pearls Teal

You may also be noticing by now that darker cardstock works better with these pigments for this particular application. 

That said, stamping and pearling a background in a light color is also the perfect "background noise" for a fabulous piece of art.


  Metallic Snowflakes with Perfect Pearls green
That's my share today, I hope you will give Perfect Pearls a try and have as much fun as I did creating these cards.


Card base:  120# White cardstock:   4-1/4 x 11, score and fold at 5-1/2
Card front:  Black, purple, teal, green cardstock  4 x 5-1/4
Scraps to die cut sentiments


 I have listed the supplies I used below. Compensated affiliate links used at no cost to you. Thank you 
for your support, it helps to cover my blogging and video expenses.


Tuesday, December 15, 2020

Using the MISTI for Layered Florals using W Plus 9 Designs Poinsettia Builder


Hi, This is Susan up for Team Tuesdays! I have been spending most every Tuesday and Thursday evenings watching Facebook Lives from Dawn Woleslage from WPlus9 Designs. Her group can be found here. I have learned a lot watching the lives and she has a technique for making a jig for layered florals or other images - here. I was doubtful when I started making them but wow it is a game changer!!! I can die cut and stamp so much at one time now. I think in one stamping session I stamped 20 poinsettias and 10 bows and bells!!! That is pretty much a record for me.

To make and use the jigs you MUST HAVE A MISTI. There is no other way to make the jigs and use them properly. I have a picture below which shows my messy jig and my dirty MISTI but both were very busy in the craft room. For each image, I counted the number of layers and die cut that many. I trimmed out the negative images. I then followed Dawn's tutorial. To use the jig just move the die cut through the negative images until you are finished the stamping all the layers. You can see a the final silver bell on the far right.


Colors: 

Reds: Abandoned Coral Distress Oxide, Candied Apple Distress Oxide, Fired Brick, smidge of Black Soot with a dauber

Greens: Mowed Lawn Distress Oxide and Peeled Paint 

Boughs: Evergreen Bough Distress Oxide and Pine Needles Distress Ink

Silver: White Pigment ink daubed with Hickory Smoke Distress Oxide, Black Soot Distress Oxide, Black Soot Distress Ink

Browns: Gathered Twigs Distress Oxide and Walnut Stain

The background is a mixed media piece using a technique from Lydia Fielder. I applied grey acrylic paint to Neenah 110 lb card stock and let it dry. I then applied a thick layer of Elmer's Glue - yes the stuff we used in school. I allowed this to air dry until tacky. I then applied a layer of white chalk paint. I left this out overnight and probably longer to dry. As it dried the cracks formed making it look like birch bark. I decided though that birch bark was boring. I added splatters of Black Soot Distress Oxide. Then I squeezed some Versamark reinker out onto my craft mat and used a brush to apply dots of ink around the background. I added Wow Metallic Platinum embossing powder and heat embossed. I also heat embossed the edges. Finally, I added some thin layers of Black Soot using a dauber. To add some sparkle to the bough, I added matte medium and Rock Candy Distress Glitter.


Thanks for stopping by;

Susan

Products Used: I am using compensated affiliate links at no further cost to you. My Sweet Petunia supplied the MISTI used in this project. I purchased the remaining supplies myself.

Thursday, December 10, 2020

Ho Ho Ho Christmas card using the new Mini Misti

Hello friends! Today I'm sharing this Christmas card featuring the new Mini Misti that has been recently released. I love the size of this Mini Misti and I used it a lot! The two background stamps that I used on this card fit perfectly inside this Mini Misti which for me was a plus! The stamps and dies for today's card are from Pinkfresh Studios and Taylored Expressions. 


Let's begin! I started by placing the Pinkfresh Studio Winterberry Background Cling Stamp inside the Mini Misti and stamped onto a kind of mustard color of cardstock with WOW! Embossing Pad and then heat embossed this panel using WOW! Opaque Bright White embossing powder. In the picture below you can see how the cling stamp fits inside the Mini Misti. 


Then, I stamped the Christmas Simple Strips Stamp by Taylored Expressions using Catherine Pooler Uniper Mist and I die cut the sentiments with the Taylored Expressions Simple Strips Dies. These sentiments are my favorites for being so easy to make a bunch in a wink. and Again, as you can see in the picture below the Christmas Simple Strips Stamp fits perfectly inside de Mini Misti.


Now, I will add color to those leaves and berries in the background using R14 Copic marker and the blue shade from the Kuretake Gansai Tambi Gem Colors. Additionally, I adhered a white folded notecard at the back of this panel using glue.


To create the HO HO HO words I die cut the Pinkfresh Studio Lea's Ornate Lowercase and Uppercase Dies out of two shades of pinks, one lighter and one darker. I Die cut three times each letter and then glued them together for more dimension. 


I also Die cut a tag out of vellum using the Pinkfresh Studio Essentials Classic Tags and added it to the center of my background. I placed the HO HO HO words on top of this velum tag using glue.


Finally, I added a piece of blue-white twine to the tag and placed a strip sentiment on top using glue and this card was finished. I love the look of this non-traditional Christmas card, hope you like it too. I wish you a wonderful day and see you next time!

Your Friend,

Karen


Tuesday, December 8, 2020

Winterberry Joy Card with Channin

Hello friends! It's Channin here and today I have a festive holiday card to share! Today’s card features the beautiful Winterberry Background Cling Stamp and the Merry and Bright Frame Stamp and die set from Pinkfresh Studios!


To create this card I first stamped the Winterberry Background over a 4 1/8” x 5 3/8” panel of light green cardstock in Emerald City ink. I then copic colored the leaves, the berries, and even added a shadow. 


Leaves: YG06, G14, G07

Berries: R35, R37, R59

Shadow: W-3, W-5


After I finished coloring in the background I then adhered the panel onto the front of an A2 top-folding card base. Next, I stamped some smaller berries from the Merry and Bright Frame Stamp Set also in Emerald City onto a scrap of light green cardstock. I then copic colored the images in and then fussy cut them out. 


Next, I stamped and gold heat embossed my sentiment. I then die cut it and some white craft foam with the matching die and adhered the two together. I then finished the card by adhering the sentiment and smaller berries to the card front with foam adhesive. 


I hope you enjoyed my card! Thank you so much for stopping by!


~Channin


Supplies:


Tuesday, December 1, 2020

Winter Woods

Hello Everyone,

Ceal here for Team Tuesday. Can you believe that it is December already? Have you gotten a good start on making your holiday cards? Every year I make about 200 cards to give to the staff and residents of a nursing/rehabilitation center down the road from me and the MISTI makes it so much quicker and easier.


Today I am sharing a couple cards using the the Winter Woods Heroscape by Hero Arts.  To create both of my cards I started with some white cardstock and the Original Misti. I placed the layering trees in the Misti and stamped them in different colors of greens. On the first card I used distress inks in Speckled Egg, Evergreen Bough and Pine Needles. I created the sky using Hero Arts Reactive inks in Pool Party, Blue Hawaii and Thistle along with the Life Changing Blender brushes by Picket Fence Studios. The Santa sleigh and greeting are from a previous MMH set. 


The second card uses the same set I just used different ink colors for the trees. I used some iks from Pink Fresh Studios in Misty Coast, Mint, and Meadow.


Have you heard the news that the Mini Misti is now available in the new format? Just in time for Christmas!


 Below you will find links to the products used. Click the picture to start shopping. Compensated Affiliate links are used at no additional cost to you. Your support helps me to keep bringing you new projects and I appreciate that so much!  

Thank you!


Friday, November 27, 2020

Sending Hugs

 Hi everyone,

Ilina here. I have super fun card to share with you today using Catherine Pooler Designs Pumpkin Patch set along with the Best in the Patch. 

Also as a reminder, the MY Sweet Petunia Black Friday Sale is going on, and also we have the Mini Misti in the New and Improved Design (like the original MISTI)

To make the card I used my MISTI to stamp the soup bowl, first in Samba red ink, then added Rockin' red on one side, blended with dauber tool to remove the harsh edges and stamped again to create "shadow". Next I die cut it and adhered to die cut white circle. Using masking paper I ink blended strips onto white panel. Once done, stamped the sentiment and assembled my card. 


Tuesday, November 24, 2020

Nuvo Shimmer Powder Snowflake Cards

 Hey card making friends, welcome back.  Sandi here and I have a new video for you today sharing how I like to mass produce holiday cards with one of my favorite techniques and products - Nuvo Shimmer Powder.

It's a take on the Embossed Resist Technique with a fun and messy artistic result.


For today's video I'll be working with this fabulous "Wishes Snowflake" stamp from Colorado Craft Company and using my standard sized Misti to do all the heat embossing.


As I explain in the video, I like to cut up my watercolor paper to 4-1/4 x 5-1/2.  Then I white heat emboss the image onto all the pieces, I think I used 11 for this round.  

As this is a little messy, it's a great idea to get as many pieces ready as you can before you start and don't forget to set up some paper towel in a convenient and close location to set aside each one to dry.


I used painters tape to tape down each piece of embossed watercolor paper to a hard board too.  This helps to keep the pieces flat, it also gives you something to hold onto while you work and move them around.


As you can see, the Nuvo Shimmer Powders come in beautiful colors.  There is also a sheen in the pigment, so when dry, they are beautiful and shimmery too.

Here is my quick video walking you through the process I like to use for this technique, and then I quickly do 3 more color combos for you, before explaining quickly how to put the cards together:


Want to find the products I used?  I have them listed below.  Compensated affiliate links used at no cost to you. Thank you for your support, it helps to cover my blogging and video expenses.


Thursday, November 19, 2020

Fall Slimline Card with Karen Reategui


Hello friends! Today I’m over My Sweet Petunia Blog sharing this slimline card featuring the original MISTI and Pinkfresh Studios products.


Let’s begin! I started by die cutting the Slim Scallop Circle die out of gray cardstock and then I adhered a white folded slim notecard at the back using glue. Next, I die cut the Curvy Floral Vine Stamp die out of white cardstock. I placed the negative part inside my MISTI and the die cut in the negative space. I lined up and inked up my stamp and pressed firmly the stamp into the cardstock.


I repeated these steps until I finished with all the florals and arranged them around the scallop circles in my background. Additionally, I die cut three times the Leafy Branch die out of orange cardstock and added them next to each floral using glue.


I also die cut the word FALL using Lea’s Ornate Lowercase die set out of orange. The outline part of each letter was die cut out of white cardstock for more contrast.


Finally, each letter were added to my background using double sided foam tape and I put some iridescent jewels around.

I really hope you like this card and get some inspiration. Thanks for stopping by and have a fabulous day!
Your friend, Karen


Tuesday, November 17, 2020

Using the MISTI to stamp on monoprints


This is Susan on the blog today. I had so much fun using my Gel Press to make this card. I have the 8x10 Gel Press. I wanted to make a neutral background. So I used blue paint mixed with white applied to the top half of the plate. I applied Titanium Buff and Pebeo Silver to the bottom. I applied a stencil to the top and pulled my first print. I let remaining paint on the Gel Press dry. Once this layer was dry, I added a thin layer of titanium white and pulled a print which you see above. 

I then used W Plus9 Designs Snow Scenes and my MISTI to stamp the background. I used Evergreen Bough Distress Ink. I used my heat gun to heat set this. For the second layer, used my MISTI to line up the layering stamp. I stamped this with Versamark and then added Judikins White Diamond embossing powder. 

Using my MISTI I stamped the large snowman from Most Wonderful. I used Distress Oxides for all stamping. I also stamped the little ground from Snow Scenes. I popped up my finished snowman with 3M foam tape. 

For the background I used an A2 sized piece of Neenah Solar White and stamped the most distressed looking plank from Wood Planks with Pumice Stone Distress Oxide. I used my MISTI for stamping the background as I needed to shift the paper up as I stamped. For the sentiment, I die cut Sending Cheer from a green paper similar in shade to what I used in stamping. I cut it 3 times and stacked the layers using a liquid glue. I then adhered this to the main panel using liquid adhesive once again. A few sequins and I called it done!

Thanks for stopping by;

Susan

Products Used: I am using compensated affiliate links at no further cost to you. I purchased all products used in this project.