Tuesday, June 30, 2020

Double Background Stamping with the MISTI


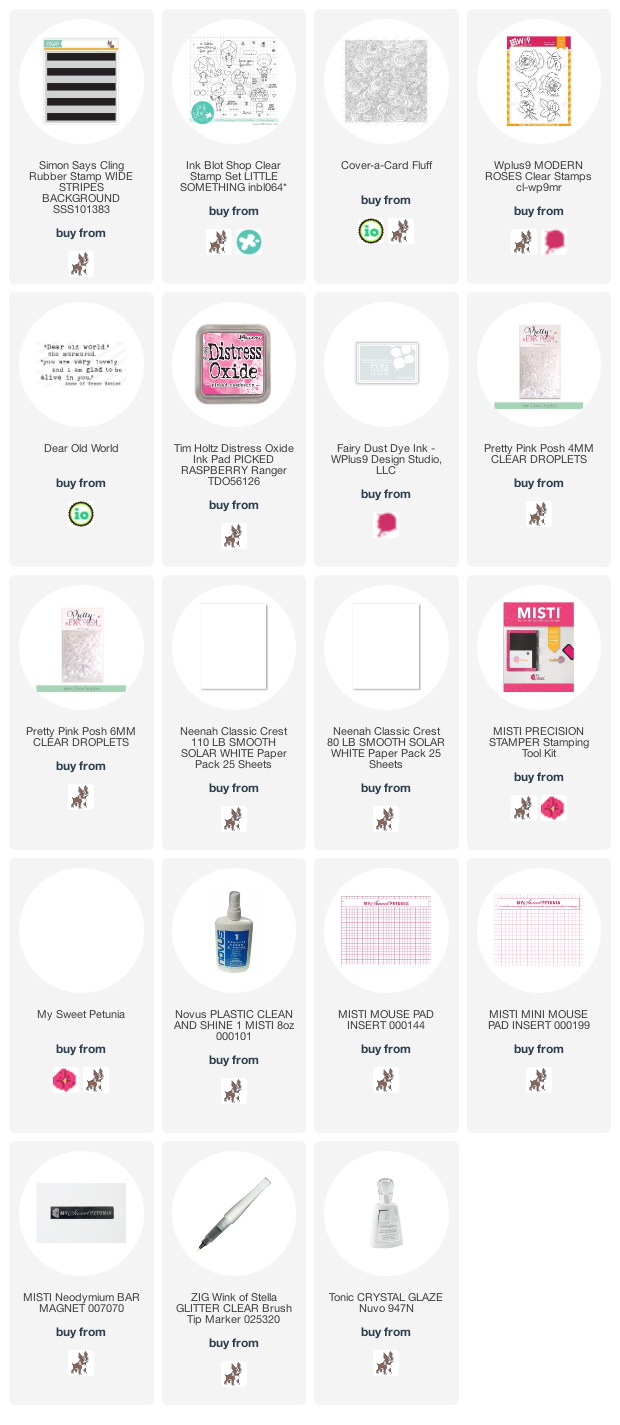
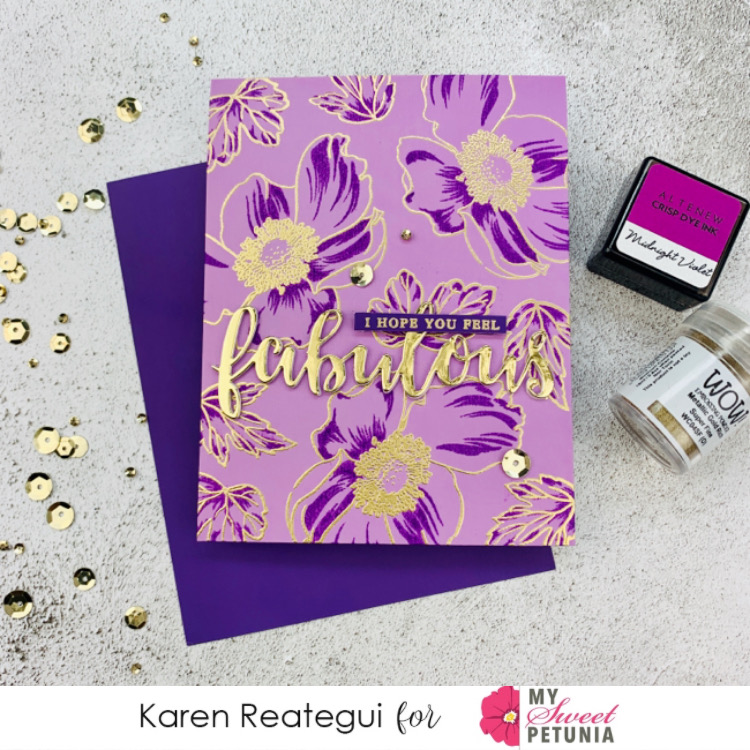
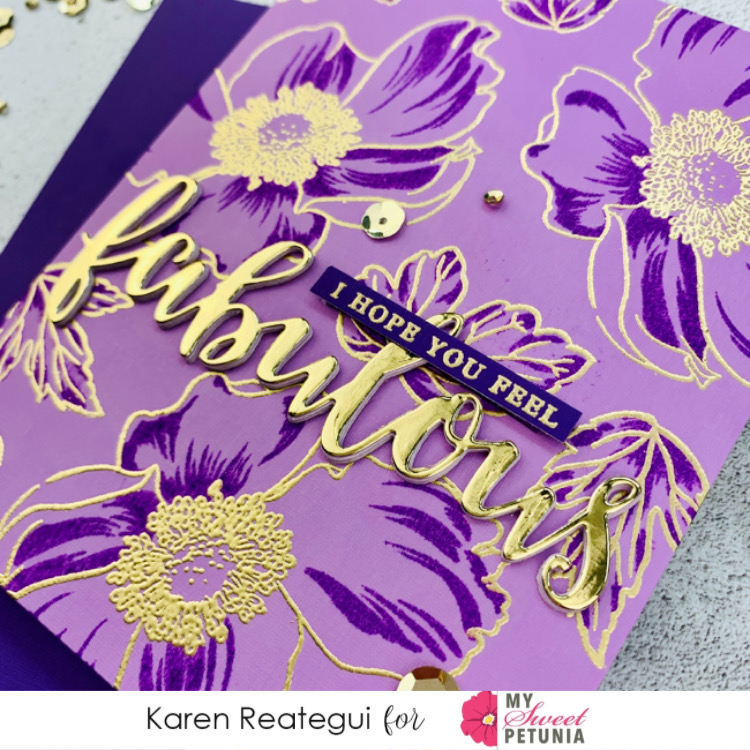
Have you ever wanted to layer one cling background on top of another? Well I have and I am not a fan of kissing stamps. Sometimes, I just want a faint layer to show through a darker pigmented layer.
Using my regular sized MISTI and Neenah Solar White 80 lb card stock, I inked up Impression Obsession's Cover-A-Card Fluff cling stamp with WPlus9 Designs Fairy Dust Dye Ink. It is important to use a dye ink for the first layer as the ink is translucent. Once I was done with the stamping, I heat set the ink.

Leaving my card stock in the same position, I added Simon Says Stamp Wide Stripe to the door of the MISTI. I inked it up several times with Picked Raspberry Distress Oxide. For the second layer I found that using a pigment ink was best as these inks lay down a layer of opaque ink and will hide the first layer. I then set this main panel aside to dry. Once it was dry, I cut it into a 4" x 5.25" panel and mounted it onto a Neenah Solar White 110 lb card stock side folding note card.


I am making this card for my granddaughter so I stamped the cute little girl with a big bow from Ink Blot Shop's Little Something stamp set. I used my mini-MISTI to stamp this image on a scrap piece of Neenah Solar White 80 lb card stock with Memento Tuxedo Black ink. It is very humid here so I had to heat set this before using my Copics to color the image. I colored her in my granddaughter's favorite colors of navy blue and pink. I used B91, B95 and B97 for the blues, RV11, RV14, RV19 for the pinks. I stamped the leaves from WPlus9 Modern Roses with Memento Tuxedo Black ink and colored these in with various greens. Honestly, they were sitting on my desk so I decided to add them at the last minute.

I used my mini-MISTI to stamp the sentiment - Lovely Old World- from Impression Obsession using some Versafine Onxy Black ink. This is a cling stamp so I removed the foam pad from my mini-MISTI. After this I added some droplets from Pretty Pink Posh. I also added Clear Wink of Stella to the bow and her dress. I allowed that to dry and then added some Nuvo Crystal Glaze to the bow.

Thanks to Lydia Fiedler for adding me back to the team 
and to you for stopping by;
Susan

Products Used: I am using compensated affiliate links at no further cost to you. I make a small commission on each sale. I was gifted some of the stamp sets used in this card but the majority of the supplies I purchased myself! 


Thursday, June 25, 2020

Fabulous Card with Karen Reategui


Hello friends! Today I made this card for My Sweet Petunia Blog and I’m using a Build a Flower Anemone Stamp Set and Script Word 2 from Altenew.


Let’s start! I gold heat embossed the outline layer of these flower and leaves using WOW! Metallic Gold Embossing Powder. In order to stamp the 3 images at once I used my MISTI just like you will see in the next picture, this way you gain time and in case you didn’t have a good impression, you can always stamp again with your MISTI.


Once all my images were stamped I gold heat embossed them. By the way, I’m using a colored cardstock Lavender Fields from Altenew for this card. Next, I stamped the detailed part for the flower and leaves using Altenew Midnight Violet ink. I achieved this with the help of my MISTI, positioning and stamping all 3 stamps at once until I completed my panel. See picture below.


After stamping all the detailed images, I die cut the Fabulous word die out of gold cardstock and to get more dimension I die cut four more times the same die but this time using Deep Iris cardstock.


I added a white note card at the back of my background and then I adhered as well the stack of die cuts that I glued one on top of each other.


Finally, I stamped the sentiment using my MISTI with gold embossing powder over Midnight Violet cardstock and placed it on top of the fabulous word. As the final touch I added a few Antique Gold sequins and my card is finished. Thank you so much for stopping by and have a fabulous day!

Karen


Tuesday, June 23, 2020

Hexagon Rainbow Card with Channin Pelletier


Hello all!! It's Channin here and today I have a fun rainbow card to share!! This card combines one of my favorite stamping techniques, partial inking with the one of the new pop out cling stamp sets from Pinkfresh Studio!

To create this card I first die cut the hexagon panel twice out of white cardstock using the Simply Hexagons Die. I then used one of the diecut panels to help me position the solid hexagon stamp from the Pop Out Hexagons Cling Stamp Set. Once I had the stamp positioned within one of the openings of the panel I then picked it up with my MISTI and then popped in an A2 top-folding card base of white cardstock into the well of my MISTI.


I picked out two shades of inks, a light and a dark, for each color I chose to use for the hexagon pane. I started with pink and first inked up the stamp in Sparkling Rose (my light) and then stamped. Next, I partially inked up the upper left corner of the hexagon by angling my ink pad (Bubble Gum) so only a small portion comes in contact with the stamp and then stamped, this creates a subtle gradation. I then repeated this process for all the hexagons with my different ink combos.

Pink: Sparkling Rose + Bubble Gum
Red: Coral Reef + Passion Fruit
Orange: Apricot + Clementine
Yellow: Sunshine + Sweet Mustard
Light Green: Fresh Pear + Key Lime
Green: Mint + Meadow
Blue-green: Aquamarine + Mermaid Cove
Blue: Sky Blue + Summer Showers
Dark Blue: Seaside + Blue Jay

With my card base all stamped I then used one of the die cut hexagon panels to help me position the large hexagon frame stamp from the Pop Out Hexagons Cling Stamp Set and then picked up the stamp with my MISTI. I then inked up the stamp with Rocky Slope and stamped it over the die cut panel.


I then adhered the two hexagon panels together and then adhered them onto the card base. Next, I die cut "hello" twice out of white cardstock and then the shadow out of vellum using the Phrase Builder - Hello Die Set. I then adhered all three layers together by sandwiching the vellum layer between the two cardstock layers and then adhered the "hello" to the card front. Next, I stamped and heat embossed a sentiment from the Simply Sentiments: Hello Stamp Set onto gray cardstock and then trimmed down to a strip. Lastly I finished the card by adhering the sentiment strip to the card front.

And that's it!! I hope you enjoyed my card! Thank you so much for stopping by!

~Channin

Supplies:

Thursday, June 18, 2020

Shine! Wreath Builder

Welcome everyone! Mindy Eggen here today to share a colorful card using the Mini Wreath Builder from Gina K Designs!

I love using the Wreath Builder to make cards because it's so easy to use and very relaxing. I'm using the new Let's Celebrate stamp set from Gina K Designs. I fell in love with this small grouping of stars and stamped them in a variety of colors.

I matted my panel with black card stock and added to a small 3″ x 3″ notecard.
I wanted to fill in the card a little more so I added Angel Aura Rhinestones in between the larger stars.


Creating these little notecards are great because they are a perfect size to stuff in your purse if you want to hand some out. I know there are plenty of times I wish I would have had a card with me to give someone who looks like they need a smile.
I hope you enjoyed today’s inspiration!

SUPPLIES


Below you will find links to the products used. Click the icon to start shopping. Compensated Affiliate links are used at no additional cost to you. Your support helps me to keep bringing you new projects and videos. Thank you!


Monday, June 15, 2020

Team Tuesday with Ceal: Foolproof Layering

Hello everyone! 
It's Ceal! Today I am sharing a card made with some foolproof layering stamps from The Ton.  We all know that Iliana is a genius for inventing the MISTI right. Effie Cho who owns the Ton is another genius among us crafters. She has invented (patent pending) group layering stamps made to go with with the MISTI.  These stamps have multiple layers but the genius part is she has a matching die that cuts out all the parts at one time! They are super easy to layer also because all you do is line up the registration marks (I have a picture below of the completed stamping) you don't have to worry about matching up the layers themselves. One die, yes only one die cuts out all the images! Genius like the MISTI right?


She also has sentiment sets (Easy Expressions) that work the same way, you stamp and then you line up the die and it cuts out 10 sentiments at one time! 
I used the Birthday Easy Expressions on my card. I did add a backer to the sentiment by adhering it to colored cardstock and then fussy cutting it out. Hopefully soon she will add a backer die to the collection. 


I have stamped several of the roses and the sentiments in different colors so when I need a quick card I just go and grab the elements and put it together. 


Supplies

Thursday, June 11, 2020

Thinking of You

Hi everyone!
Ilina here! Today I am sharing a card using the new The Ton set Poppy Wishes and the Catherine Pooler Designs Savannah cover die.
The Ton has recently released several sets (patent pending) that are group layering and they are made to work with the MISTI. You stamp all the first layer images at once, then the 2nd and so on. The stamps have registration marks, so when you stamp you line those up. Also there are coordinating dies and you die cut all images at once. For the Poppy Wishes stamp there are 8 finished images (4 poppies and 4 leaves) and you die cut them all at ONCE....all EIGHT!!!! with ONE die!!!
To make my card I stamped the poppies using Catherine Pooler Designs ink in the following colors: Bellini, Coral Cabana, Rockin' Red, Melon Ice ,Lime Rickey, Grass Skirt and the centers were stamped in black.
Once you have everything stamped, die cut the images. Die cut a panel from white card stock using the Savannah cover die and stamp the sentiment in black, Adhere to a note card. Using fun foam adhere 3 of the poppies and few leaves. You are done!!! 


Tuesday, June 9, 2020

Altenew Multi Layering Stamping

Hello stamping friends and welcome back.  It's Sandi here and today I'm sharing some Altenew Multi Layering Stamping combined with the Spotlight Technique.  This combo is stupid simple when using the Misti and I have a quick video below to show you how.


I'm using the Handpicked Bouquet stamp set from Altenew for today's share and the inks used are:

Blue:  Dew Drops, Aqualicious, Teal Cove
Greens: Frayed Leaf and Forest Glades


To create the spotlight technique you need to stamp the images on two card fronts, one in black and white and one in color.  I'm using Hammermill 100# for today's card and both card fronts are cut at 4-1/4 x 5-1/2 for ease in the stamping process.


Once the colored image is stamped, I used the Simon Says Stamp Stitched Rectangle Wafer Dies to cut down the image before matting it and attaching to the card front.

Watch my quick video for lots of tips and tricks to using the Misti Stamping Platform for this technique.


Thanks so much for stopping in and I hope you will give this fun technique a try.


Here are the supplies used in today's card.  Affiliate links are used where possible at no additional cost to you.  Thank you so much for your support as I use these commissions to help cover my blogging and youtube expenses.

Friday, June 5, 2020

Pink Fresh Fancy Floral


Oh my gosh!!! Three weeks in a row.  Don't get too used to it.  Summer is here and there is sunshine to spend time with.   I have a few cards for today using Pink Fresh Studio products.   There are more in the video so be sure to watch to see them all.


I finally got around to playing with Ken Oliver Color Burst.  They are fun and messy.  Consider yourself warned.   In the video, I also show you how to stack dainty die cuts.


I hope you enjoy the video.  Be sure to tell me what card is your favorite.

Thanks so much for stopping by.


Affiliate links to:


Amazon.com: Buying Choices: Misti...
[ AMZUS | MSP ]
Cut-Align
[ MSP | AMZUS ]
Bar Magnet
[ MSP ]
Super Magnets 4 pack
[ MSP ]
Fiskars FINGERTIP CONTROL CRAFT KNIFE...
[ SSS | AMZUS | MSP ]
My Favorite Things WONKY STITCHED...
[ SSS | ELH ]
Taylored Expressi0ons Thanks Script
[ TE | TE ]
Simon Says Stamp LOVE Shadow Wafer...
[ SSS ]
Pinkfresh Studio FANCY FLORAL 1 Die...
[ SSS | ELH ]
Pinkfresh Studio FANCY FLORAL 2 Die...
[ SSS | ELH ]
Take Pride, Pinkfresh Studio Clear...
[ ELH | SSS ]
RESERVE Pinkfresh Studio MODERN...
[ SSS | ELH ]
Pinkfresh Studio SIMPLY SENTIMENTS...
[ SSS | ELH ]
RESERVE Pinkfresh Studio SIMPLY...
[ SSS | ELH ]
Glossy Black - 10 pack, Essentials by...
[ ELH ]
Flower Fresh Color Burst Trio – MFT...
[ MFT ]
Brutus Monroe Color Burst
[ AMZUS | BMR ]
Color Burst Caribbean Brights Color...
[ AMZUS ]
Ken Oliver Color Burst Liquid Metal
[ AMZUS ]
Peony Color Burst Powder
[ AMZUS ]
i-Crafter I-MEND SELF-MENDING CUTTING...
[ SSS ]
Tonic DOUBLE ENDED GLUE PEN
[ SSS ]
Amazon.com: Canson XL Series...
[ AMZUS | SSS | ELH ]
Tonic MORNING DEW Nuvo Crystal Drops...
[ SSS ]
Tonic Nuvo Crystal Drops, Morning Dew
[ ELH ]
Ranger Accents, Glossy Accents
[ ELH | AMZUS | SSS ]
Concord & 9th Glitter Paper Pack...
[ AMZUS | ELH | SSS ]
DCWV Cardstock 6 x 6 GLITZY GLITTER...
[ SSS ]
Hero Arts CLASSIC VELLUM LAYERING...
[ SSS ]
Essentials by Ellen 40 lb. Vellum, 25...
[ ELH ]
Amazon.com: Tsukineko SZ000031...
[ AMZUS | SSS ]
VersaFine Clair Ink Pad, Nocturne -...
[ ELH | SSS ]
Brutus Monroe ICICLE Ultra Fine...
[ SSS | ELH ]
DMC Metallic LIGHT SILVER Embroidery...
[ SSS ]