Tuesday, March 30, 2021

Muted Floral Card with Channin

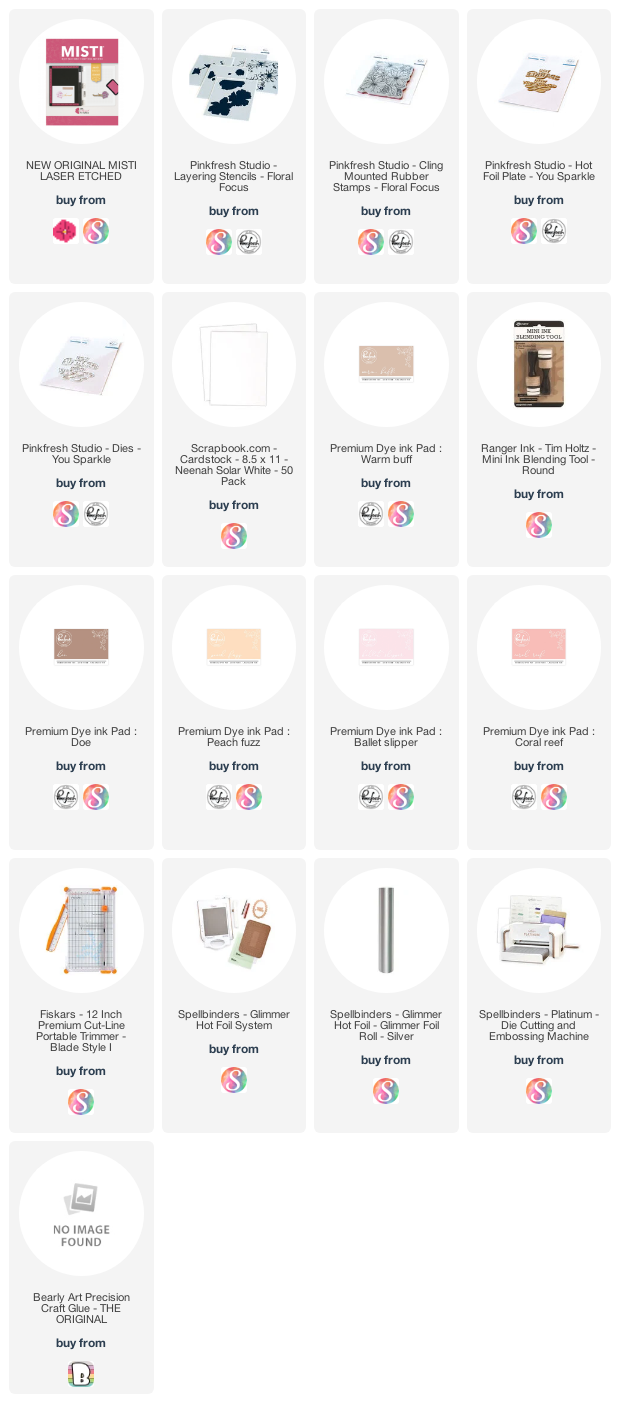
Hello friends! It's Channin here and today I have a soft and muted floral card to share. For today’s card I use the beautiful Floral Focus Cling Stamp and stencils to create my background and then finish my card with a foiled sentiment. 

To create this card I first stamped a sheet of white cardstock with the Floral Focus Cling Stamp in Warm Buff Ink. After I stamped the image I then ink blended to add color using the Floral Focus Layering Stencils and several Pinkfresh inks (Warm Buff, Doe, Peach Fuzz, Ballet Slipper & Coral Reef). 

Once I finished coloring the background, I then trimmed the panel down to 4 1/8” x 5 3/8” and adhered it to the front of an A2 top-folding white card base. 


Next, I hot foiled my sentiment in silver onto white cardstock using the You Sparkle Hot Foil Plate. I then die cut the sentiment out with the matching die and then die cut it out two more times out of scrap cardstock. I then adhered all the die cuts together to create a stacked sentiment. Lastly, I finished my card by adhering the sentiment to the card front. 


I hope you enjoyed my card! Thank you so much for stopping by!


~Channin


Supplies:


Tuesday, March 23, 2021

Exotic Tulips with Ceal

Hello Everyone!
 Ceal here, welcome to Team Tuesday!
Today I am sharing a card using the Exotic Tulips layering stamp set by Altenew.
 and a few other companies.  


To create this card I used products from several different companies. I started with stamping the tulips from the Exotic Tulips set by Altenew using the Original Misti onto white cardstock. The cover die is the Plaid Card Front Thin die by Concord & 9th and the Sentiment is the Simple Strips- Birthday by Taylored Expressions. 


Below you will find links to the products used. Click the picture to start shopping. Compensated Affiliate links are used at no additional cost to you. Your support helps me to keep bringing you new projects and I appreciate that so much!  

Thank you! 


Tuesday, March 16, 2021

Embossed Resist Technique with Distress Oxide Inks.

 Hey crafty friends, Sandi MacIver here and I have a Embossed Resist Technique with Distress Oxide Inks card share for you today.

I'm a huge fan of Distress Oxide Inks and I'm always playing with new color combos.  This one is Barn Door, Ripe Persimmon and Fossilized Amber.  It's bright and fun and perfect for spring and this technique.


I used my Misti to stamp the backgrounds with the Cosmos and Thank you Backgrounds stamps from Simon Says Stamp.

As these background stamps are rubber and foam mount, if you take the grid paper and stamping foam out of your Misti, the stamp will lay flat for stamping (watch the video for this).

Once stamped, I heat embossed the images in white embossing powder before adding my Distress Inks.


Once the piece is covered in ink, wipe it down with a dry paper towel to remove any ink sitting on top of the embossed images.

Next, I cut each background out with the new Chunky A2 Scalloped Rectangles Dies also from Simon before attaching them to A2 top folding white card bases.


Finally, I used the Simon Says Stamp Poppy Stem and Cosmos Stem dies to add three white flowers to the front of each of the cards.

The sentiments are from the Thanks Sentiment Strips.

Here is a short video I did walking you through the steps to create these pretty, and oh so simple cards.


Now it's your turn, pick your three favorite Distress Oxide Ink Colors and give the cards a try.


used for the Embossed Resist Technique with Distress Oxide Inks card:

Want to find the products I used?  I have them listed below.  Compensated affiliate links used at no cost to you. Thank you for your support, it helps to cover my blogging and video expenses.    
   

Thursday, March 11, 2021

You Are Always on My Mind

Hi everyone,
Ilina here! Today I have a slim line card for you using the Picket Fence Studios Wild Peony stamp set. To make the card I started with a piece of watercolor paper and die cut it using the Picket Fence Studios Slim Line Die cutting system (the smaller die from the two). Once die cut I positioned my panel and stamp in the MISTI and stamped the top image. Once that was stamped I moved it up and shifted to the right side then stamped the second image. Once stamped I embossed using Ultra Fine Clear embossing powder. Colored the images using Karin markers and then stamped the sentiment. Set the panel aside and created black slim line card base using 7" x 8 1/2" piece of card stock that I scored at 3 1/2".
Using craft foam I adhered the panel to the card base and added some gems to finish it off.

Tuesday, March 9, 2021

Using Your MISTI for Stencils


 Hi, Welcome to Team Tuesdays! I had a lot of bits and pieces on my desk so I whipped up this card. However, I had to make a background. I do not like putting Pixie Spray on my stencils as it makes storing the stencils difficult and taping never seems to keep things straight for me. So I thought why not use my MISTI. I have a picture below showing what I did. I do have a Silhouette Cutting Mat in my MISTI and that is sprayed with Pixie Spray. However, what makes this work is the magnetization of the platform.


So here you can see my first stencil not the one that actually made it on the card. My paper is adhered down to the mat and with magnets. I then laid the stencil on top and moved the magnets to adjust for the stencil. This kept everything perfectly aligned and stable. Nothing moved and I had no blobs of ink! So I will be using this from now on for stenciling especially with fine detailed stencils.

Thanks for stopping by;
Susan

Products Used: I am using compensated affiliate links at no further cost to you. I used a number of retired products for which I do not have links. 

Thursday, March 4, 2021

Many Blessings with Karen Reategui


Hello friends! Today I have this floral slimline card featuring Que Sera, Sera Stamp Set and Dies and the Slimline Nested Rectangle Dies from Picket Fence Studios. Also, for this card I used the original MISTI to stamp all flowers and leaves. 


Let's begin! I started by die cutting one rectangle panel using the Slimline Nested Rectangle Dies, then I placed this panel inside of my MISTI and using Soot Premium Dye Ink Pad from Lawn Fawn I stamped all the flowers from Que Sera, Sera Stamp Set around the panel. 


I left enough space on the panel to stamp the sentiment "Many Blessings". This sentiment was also from the stamp Que Sera, Sera and was stamped using Versafine Black Onyx ink. Next, I adhered a lilac slimline folded card at the back of the panel using glue. 


Also, I placed a piece of watercolor paper inside of the MISTI, added anti static powder, inked up the same flowers from Que Sera, Sera Stamp Set using black ink, stamped pressing the door of the Misti firmly and finally I added WOW! Clear Gloss Embossing Powder on top and heat embossed all flowers.  


I painted all the flowers and leaves using Zig Clean Color Real Brushes. Once they were dry I die cut them all with the matching dies. Then, on top of the panel I arranged all flowers going from bottom to top and using glue and foam tape for some dimension.


Finally, for the last touch I added some Nuvo drops, sequins and gems from the Purple Side of the Rainbow Gem Mixes also from Picket Fence Studios.


I really hope you like this card that I made with lots of love! Using your MISTI is a super easy way to stamp several images at once and save some time to create more cards. If you are interested in the supplies  I used on this card, they are all listed below. Have a fantastic week and thanks for stopping by!

Your friend, Karen


Tuesday, March 2, 2021

VIDEO: Caring Hands Eclipse Cards with Channin

Hello friends! It's Channin here and today I have a pair of colorful cards and video to share featuring the Caring Hands stamps and dies from Waffle Flower Crafts. Today’s card uses the MISTI and the eclipse technique to add a cool dimensional effect to my sentiment!


To create these cards I first stamped a sentiment from Caring Hands Sentiment Stamp set onto an A2 panel of rainbow patterned paper in VersaFine Onyx Black Ink using my MISTI. I left my stamp inside my MISTI and then adhered the rainbow panel onto the front of an A2 top-folding card base.


Next, I stamped the praying hands from the Caring Hands Stamp Set in Antique Linen Distress Ink onto Neenah Solar White cardstock. I then copic (E30 & E31 or E35 & E37) colored the hands and then die cut them with the matching die. 


Next, I grabbed a scrap A2 panel of cardstock, popped it into my MISTI and stamped the same sentiment I stamped on the rainbow panel. I then centered the praying hands die over the stamped sentiment and then ran them through my die cutting machine. I then discarded the die cut hands and placed the scrap panel back into my MISTI to use as a jig. With my jig in place, I then popped my copic colored hands into the jig and stamped my sentiment once more. 


Lastly, I finished the card by adhering my hands to the card front with foam adhesive, making sure to line up the letters on the hands with the letters on the card front.


I hope you enjoyed my cards and video! Thank you so much for stopping by!


~Channin


Supplies: