Tuesday, August 31, 2021


Hey cardmaking friends welcome back.  It's Sandi MacIver here I have a new video and card making technique for you today, Distress Oxide Inks Bleached. 

 This is also Distress Oxide Inks Color Combos and Cards #8 Video, as It's  brand new fall color blend that I put together. 

 Bonus, the art piece was so large, it ends up making two SLIMLINE CARDS


two handmade slimline cards with a distress oxide ink blended front and a bleached floral design using paper crafting products from Simon Says Stamp   

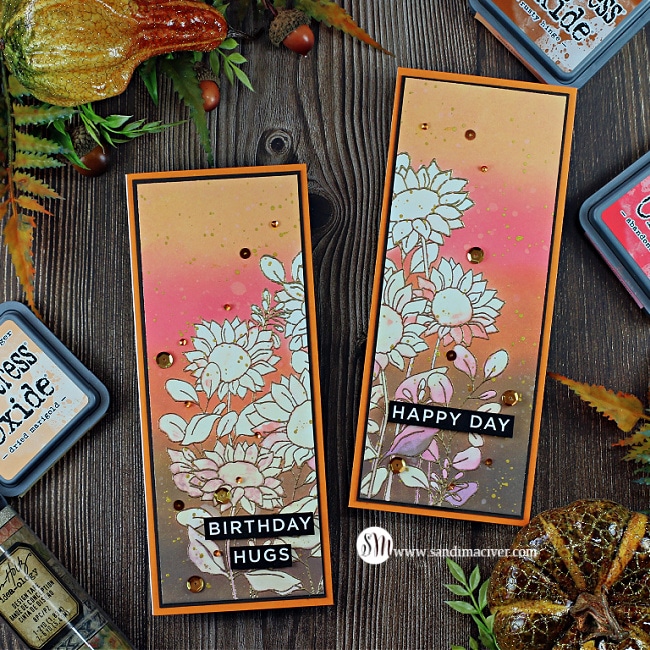
 This technique is super easy.  You simply blend all the colors together, heat emboss your image and then use bleach to remove some of the color.


A couple of tips for you to help you succeed with the technique.


  • Work in a well ventilated room.
  • Use new bleach.  Old bleach that has been hanging around for years will not provide the best results.
  • Protect your work area well just in case you spill.  I use a small mason jar, with a rounded top for my bleach and have lots of paper towel handy just in case.
  • I use an empty waterbrush with an acrylic tip, not one of my good watercolor brushes.
two handmade slimline cards with a distress oxide ink blended front and a bleached floral design using paper crafting products from Simon Says Stamp 

 For today's card I'm using the Simon Says Stamp Sunflower Garden Stamp set from the September Card kit.  
There are two stamp sets in this kit, and this first one is huge. 

 Start with a piece of Hammermill White cardstock cut at 6-1/2 x 8-1/4 and after finishing the technique, cut it in half to create two slimline cards.  

I give you the rest of the measurements in the video and in the downloadable PDF I shared today over on my blog.

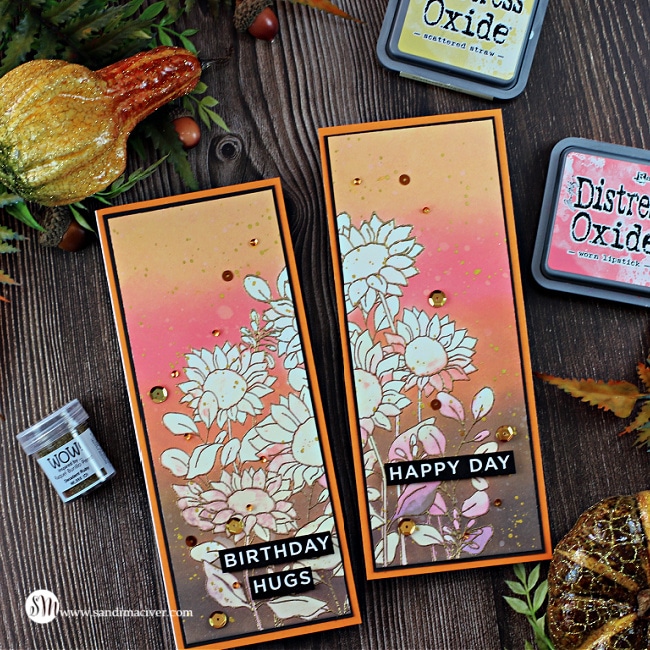
Next, I blended the Distress Oxide Inks over the card.  My new fall blend for today is:

  • Ground Expresso,
  • Gathering Twigs
  • Rusty Hinge
  • Dried Marigold
  • Abandoned Coral


 After using the Misty to stamp the image in VersaMark Ink, I used Wow embossing powder Decadent Ruby to heat emboss the image. 

It has a combo of ruby and gold embossing in it and is quite beautiful. 

  I opted for Simon Says Stamp Autumn Mix sequins as my final embellishment. 

   two handmade slimline cards with a distress oxide ink blended front and a bleached floral design using paper crafting products from Simon Says Stamp   

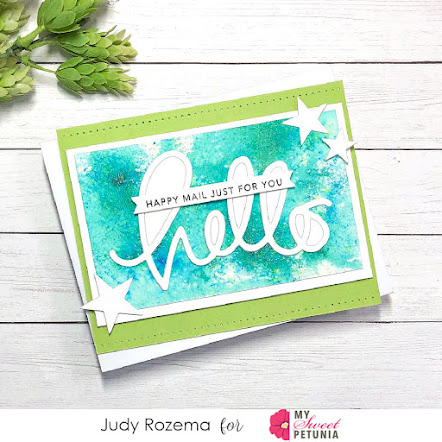
 Look closely at the leaves at the bottom of the right card.  This was a happy accident.  I painted them when the brush tip was almost dry, so the bleach didn't take all the color out.  Hard to achieve, but very pretty.  

Here's today's Distress Oxide Ink Bleached Video. 
You can check out the other 7 Distress Oxide Ink Color Combos and cards over on my Youtube


Here is today's video:


used for the Distress Oxide Inks Bleached cards:

Here are the products I used today.  Compensated affiliate links used  where available at no cost to you. When you click on a thumbnail link and shop you are supporting my website allowing me to continue bringing you new projects and videos.  Thank you.


Tuesday, August 24, 2021

MISTI and the Cut Up Bouquet


 Hi, Susan here on the blog with this card featuring products from WPlus9 Designs and my MISTI, of course! Without my MISTI, the card would have been impossible because I needed to stamp multiple times onto textured watercolor paper and to help with lining up images and items. 

For the main image I used Kind Soul stamped onto Arches 140lb cold press watercolor paper using Fade Out Ink from InkOn3. I did use my MISTI to stamp this about 4 times before my old eyes could see the image enough to paint! I then pulled out my Daniel Smith watercolors and my DaVinci Cosmotop Rounds #4 and #6. Once I felt it was complete, I tried to fit the bouquet as a whole on some sort of interesting background. That wasn't going to happen. So after about 4 hours of painting not including drying time, I cut the bouquet!!!! This allowed me to strategically place each section. I did allow the leaves and blooms to hang off the edges of the card as I will be delivering this card in person.

For the background I used Vintage Script after I had distressed a piece of watercolor paper with Distress Oxides and water splats. The frame was die cut using Postage Layers die set and then a rectangle from Hero Arts Infinity Rectangles. The sentiment is from Flora and Fauna 3. 


Thanks for stopping by;

Susan

Products Used:

I am using compensated affiliate links at no further cost to you. I make a small commission on each sale again at no further cost to you.


Tuesday, August 17, 2021

Two Palettes One Card with Channin


Hello friends! It's Channin here and today I have a unique card concept, incorporating two color palettes into one card. It might come as no surprise that I stumbled upon this idea after taking crafty u-turn from a 70s sort of neutral palette that I started to lose faith in and opting for a more reliable bright palette. But then break through moment, I thought I should just try combining my neutral flowers with my bright happy rainbow and boom, I was in love!! 

To create this card I first stamped the flowers from the Infinite Blooms Stamp Set onto white cardstock in Gathered Twigs. Then using the Infinite Blooms stencils I ink blended to add color to the image with several inks (Doe, Marigold, Persimmon, & Bubble Gum). When I finished ink blending I then popped my image back into my MISTI and stamped the image again then die cut it out with the coordinating die. I then repeated the process to make another floral image so I had two. 


Next, I stamped the front of an A2 top-folding white card base with the Pop Out: Rainbow Cling Stamp Set in several inks (Blue Jay, Aquamarine, Bubble Gum, Passion Fruit, Clementine & Marigold). I then die cut a thin frame out of white cardstock and adhered it to the card front. Next, I stamped a sentiment from the Known and Loved Stamp Set in Gathered Twigs. Lastly I finished the card by adhering my floral images to the card front and trimming off the overhang.


I hope you enjoyed my card! Thank you so much for stopping by!


~Channin


Supplies:

Thursday, August 12, 2021

Forest Critters

 Hello!  I love building scenes with cute die-cuts but I don't enjoy cranking out all the pieces I need.  It can take quite a bit of time to make sure the images are die-cut perfectly and I am always impatient to get to the creative part!  The following technique makes it so much easier to get to the coloring and setting the scene!      It's also an especially helpful technique for die-cutting very small images.


First, stamp the images on a scrap sheet of paper.  Do not remove the stamps from the lid.


Next, die-cut all the images from cardstock. Allow some space in between so that the individual negative die-cuts can be separated.  


Next, remove the inside pieces and set them aside. Place the negative frames over each image.  This is where the magic happens.  Arrange the frames precisely around the images so that the images are exactly centered inside the framing. 


Once the frames are placed precisely, add the negatives back into the frames taking care not to move the frames. 

Ink the stamps that are still on the lid, close the lid, and stamp!  Viola!  perfectly centered images; even the teeny tiny ones!  If the images are too small to color, pop them back into the frame, adhere on the back with a little bit of removable tape or Washi tape, and color!  


After placing the die-cuts on the card layer to form a scene I adhered them to the top layer. Next, I adhered the top layer to the base.  Then, I placed the card in my MINI Misti to stamp the sentiment.  I like to adhere my designs to card bases before stamping the sentiment so that I can make sure the sentiment is perfectly aligned to the bottom of the card base.  Just make sure your lid is wiped free of ink before stamping so that ink doesn't accidentally go where you did not intend!

I used both the MISTI, the Mini MISTI, and the Cut-Align ruler for today's project.

I am Angie, and I am so glad you stopped by today!  If you would like to see the super cool painting my daughter painted for me, click HERE.  The painting inspired my design with its vibrant colors!

Thanks so much for stopping by!  

**Affiliate links used when possible at no cost to you!**


Wednesday, August 11, 2021

Hello! Nuvo Shimmer Powders Background.

Hello everyone! Judy here with a fun background and large greeting for you!

For this week's card, I started with a background that I made using Nuvo Shimmer powders (Atlantis Burst and Green Parade). I adore these powders because of the shine and sparkle. Sprinkle, add water and voila! Out of my box of leftovers and unfinished elements, I pulled this Hello Word Die from Simon Says Stamp that didn't cut all the way through (for a previous project), and decided to use it just as it was. I stacked two together for more dimension (neither had cut!). I added a sentiment strip from Taylored Expressions on top, using my MISTI and VersaFine Clair Nocturne to get a crisp image. I had some stars cut from Ice Silver cardstock (CutCardStock) that I used for the corner elements and did some old school piercing along the top edge.


Happy Mail for a sweet friend! Thanks for stopping by!

Tuesday, August 10, 2021

Statement Flowers


 Hello crafty friends and welcome to another edition of Team Tuesday! It's Ceal, here and today I am sharing a card using the Statement Flowers set by Altenew. This card is also part of an Altenew hop where Altenew is giving way prizes. For all the deets head over to my blog, Simply Beautiful.


To create this card I started with a top folding white card base and a white panel.
I stamped the image on a seperate piece of cardstock, colored it using Alcohol markers and cut it out with the coordinating die. 
I added a little gold on it by watering down some Paper Glaze and splattering it using a paint brush. 


Below you will find links to the products used. Click the picture to start shopping. Compensated Affiliate links are used at no additional cost to you. Your support helps me to keep bringing you new projects and I appreciate that so much!  

Thank you! 


Thursday, August 5, 2021

One Year Awesomer

 Hi everyone!

Ilina here! And since this week I am in a rainbow mood, I am sharing a rainbow card. It's not really a rainbow, but the circles are stamped in rainbow order. 

For my card I used couple stamp sets from Catherine Pooler Designs: Circle Party and Toast to you. To make it I used my MISTI to position the two little circles and stamped repeatedly to create my pattern in rainbow color order. When I do pattern like this I started stamping in the center. I wanted the larger of the two circles to be in the center, so I positioned it in the center of my panel, then positioned the smaller one next to it. Moving my panel left, right, up and down in my MISTI I completed my pattern. 

Once I had all the circles I stamped the black ones in the middle or the larger ones. Trimmed the panel to 4" x 5 1/4". Next stamped the sentiments on black card stock and embossed in white. Trimmed to size and assembled my card.

Super fun and easy!!! 

Tuesday, August 3, 2021


Hey crafty friends welcome back to Team Tuesday.   Sandi here and today I'm sharing a card created with the Ellen Hutson Everything's Beachy stamp and die set.

 Ellen's latest releases have been minimal stamps, and it's fun to create super simple, minimalistic cards with this adorable stamp set. 

Around here, we might finally get some rain so not a great time to go to the beach, but we can dream right?  haha.  


How to create the Ellen Hutson Everything's Beachy Card #2:

Use the Misti to stamp the three elements needed for the card onto white cardstock with Copic friendly black ink.

Color the images with Copic Markers:

Yellow:  Y15, Y19, Green YG01, YG23, Turquoise BG11, BG13, Orange YR04 YR07 Skin - E 53 
 Use the coordinating dies to cut the images out. 


Finishing Off the card:

Search your scrap bin for scraps the same colors as your coloring.  
Cut them into strips to glue along the bottom of the card. 
 Place the card back into the Misti to stamp the sentiment 
 Use Foam squares to attach the  images to the card front. 

 Pretty cute for a single layer card right?  and qualifies for my 10 Minutes to WOW cards.   


used for the Ellen Hutson Everything's Beachy Card :

Here are the products I used today.  Compensated affiliate links used  where available at no cost to you. 

When you click on a thumbnail link and shop you are supporting my website allowing me to continue bringing you new projects and videos.  Thank you.