Wednesday, September 29, 2021

Just Buzzin' Around

Hello everyone and Happy Fall! As I (Judy) am writing this, I can hear a symphony of crickets, cicadas, and bees, and I am ok with that as long as they stay OUTside! There are so many bees in my marigolds this year (which went wild from seeds last year!), and although they aren't the big fat bumbles like these, I am happy to see them buzzing around pollinating everything still.

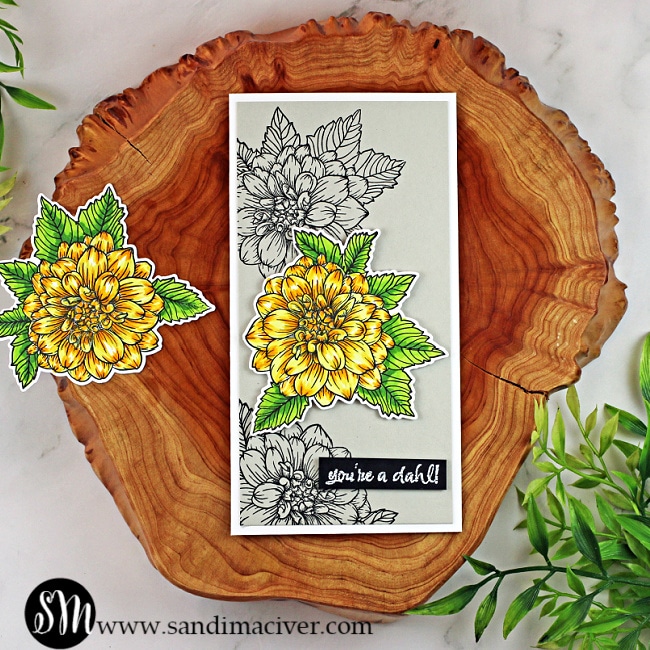
Most of these stamps and dies are from the Hero Arts January 2021 MMH Kit. I had not even used them yet! So today they got to see some ink - and embossing! This kit is not available anymore, but there are other fabulous options out there to recreate this card.

I first cut a circle using a wonky stitched circle die (MFT Stamps) out of the Pale Yellow Glitter paper that came with the kit. I added the Honeycomb window die, also cut with the same circle. I stamped the flowers from the kit using my Original MISTI 2.0 and cut them out as well. And guess what? They were huge for my A2. I could have made a square card, but decided to stick with the usual A2, and just cut each side off the circle. I ended up really liking it. The flowers layer is popped up with foam tape.

Into the MISTI went my fat bees! The bees are stamped in VersaFine Onyx Black and embossed with clear embossing powder. I colored them with Copic markers, cut them out, and popped them up on the flower layer. I added some sequins from Honeybee Stamps. I layered all of this on a black mat, cut out with a wonky stitched rectangle die (MFT). To finish the card, I added some metallic gold Kreinik thread around the middle, and the word "buzz" using the Tall Skinny Alphabet from scrapbook dot com. If you're having trouble lining things up evenly (such as these skinny letters), use your MISTI Mouse Pad or Grid Paper Pad gridlines!

Off to get my morning coffee BUZZ. :-)


Tuesday, September 28, 2021

Misti and Hero Arts Dahlia


Hi cardmaking friends and welcome back.  It's Sandi MacIver here and today I have a Mini Slimline Hero Arts Dahlia Card to share with you.  

Yet another stamp and die set from that bin labeled "bought but not used yet"....I am determined to empty that thing, LOL. 

 As all the Dahlia's are showing their fall colors right now, I thought it would be the perfect time to color this sweet stamp up.  

I decided on a gray/yellow color combo as I really like how the yellow contrasts and POPS. 


How to create the Mini Slimline Hero Arts Dahlia Card:

Use the Misti Stamping Tool to stamp the Dahlia in Gina K Amalgam Ink (copic friendly). 

 Heat set it until it's dry and then color with copic markers 

 Next, use the coordinating die to cut out the image. 

 Place the card front into the Misti and use VersaFine Clair Nocturne Ink to stamp the image twice in black. 

 TIP - this is my favorite black ink for outline stamping, it's so BLACK.....you will love it, you only have to stamp once. Finally, white heat emboss the sentiment onto a scrap of black and trim.

  handmade mini slimline card with a yellow Dahlia using cardmaking and paper crafting products from Hero Arts

Mini Slimline Cards:

I decided on the mini slimline size of card because of the size of the image. 
 It's smallish, and looks fabulous stamped in black to create interest in the background.
 I also didn't have time for a pile of coloring.  Being able to color just one image and have it absolutely POP of my card is ideal.

 I also find mini slimline cards are the perfect size to send someone a little hello how are you. (you don't have to write a book to fill the inside, LOL). 

 
  handmade mini slimline card with a yellow Dahlia using cardmaking and paper crafting products from Hero Arts  

Copic Markers Used:

Yellows:  Y11, Y15, Y19, Y38 
 Greens:  YG03, YG23, YG67 

 Finally, mail it in one of the beautiful Lemon Chiffon mini slimline envelopes from Simon Says Stamp (they are so pretty) .


used for the Hero Arts Dahlia Card:

Here are the products I used today.  Compensated affiliate links used  where available at no cost to you. When you click on a thumbnail link and shop you are supporting my website allowing me to continue bringing you new projects and videos.  Thank you.  

Thursday, September 23, 2021

MISTI Magic!

Hello!  Angie, here with you today!   Today's project shows just how incredible the MISTI really is!  

Combining Stamps to Create a Scene: First, I placed the mug stamp in an Original MISTI and stamped three on regular cardstock and two on watercolor paper.  Next, I placed the mug-stamped cardstock in the Mini MISTI. A piece of clear acetate came next and then I positioned the butterfly on the acetate and stamped it.  It took several times to get the butterfly positioned just right. Using the acetate allowed me to wipe the butterfly away and reposition it without wasting paper!  

Stamping Multiples: After taking the time to line up the stamps, it would be silly not to stamp multiples!  I stamped the mug and butterfly on several pieces of cardstock and watercolor paper. I plan to stamp a few more since the stamps are still in the MISTIs.  

Stamping Backgrounds: I really wouldn't attempt this next step without a MISTI.  I masked the butterfly and mug then stamped the floral background.  With large stamps like this, it usually requires stamping twice which makes the MISTI an invaluable tool.


 **I am using compensated affiliate links at no further cost to you. I make a small commission on the products used in the links below.**

All of the stamps featured today are from Impression Obsession and are listed below!

Thank you for stopping by and happy crafting!

                   Angie            


Tuesday, September 21, 2021

Critters, Flowers and A Slim Line Card


 Hello Everyone!

This is Susan and I hope all is well at you. I am just finishing up some cards for my grandchildren and then yes, I am going to start on Christmas cards. This card is for one of my grandsons. He turned 3! He likes to climb so I decided to use the tall slimline style for my layout. 

Using a stencil and embossing paste, I layered some bricks onto a piece of Neenah 110 card stock cut to 3.5" x 9". While that was drying, I got out my MISTI and I stamped out several pieces from Reverse Confetti Cup of Friendship, Lemonade Stand, Ice Cream Social and Later Alligator onto Neenah Solar White 80lb Super Smooth card stock. I then used soooo many different colors of Copics markers to color these flowers and critters. 

I die cut Happy Confetti Cuts from Neenah Solar White and Reverse Confetti Avocado card stock. I did layer the word Happy 3x using liquid adhesive. Once I had all the pieces gathered and finished, I used my regular sized 2nd Edition MISTI and my Creative Corners to line everything up. I use the magnets like other crafters use temporary adhesive or Press N'Seal. For me this method works best as I can move things around more easily. I highly recommend purchasing the Creative Corners. I love mine and use them every day I craft. For a finishing touch, I added clear droplets. 

Thanks for stopping by and get that MISTI out;

Susan

Products Used: I am using compensated affiliate links at no further cost to you. I make a small commission on the products used in the links below.


Thursday, September 16, 2021

Bird of the Woods- Mass Producing cards

 Hi everyone! 

Ilina here. Today I am sharing easy to mass produce super colorful cards. All you need is your layering set, sentiment set, embossing folder, your MISTI and colorful inks.

For my cards I combined products from several companies. 

To make the cards I started by die cutting bunch of bird die cuts from white card stock. I used the Bird of the Woods stamp and die set from Altenew. Next with help of my MISTI and the negative space of one of the die cuts I stamped all the layers on the birds starting with the black outline. 

Once the birds were done I set them aside. For each stamped bird I cut 3 additional die cuts from white card stock that I didn't stamp on. I use these for stacking.

Next I stamped bunch of sentiments from the Perfect Sentiments stamp set from Pinkfresh Studio. Die cut them, along with just plain die cuts (for stacking) and set them aside.

Then using different embossing folders I embossed white panels and cut them to 4" x 5 1/4". 

Adhered the stacked birds and stacked sentiment, then adhered the whole panel to a white note card. I again stacked card stock on the back to add more sturdiness and dimension. But you can use craft foam or foam tape. 

Wednesday, September 8, 2021

A Fall Hello from Judy

Happy Wednesday! Judy here with some vacation inspiration. Our family just returned from a fabulous couple of weeks away in the Northeast, where we were able to explore Boston (one of my favorite cities), parts of Vermont and New Hampshire, and end up in one of the most beautiful states - Maine! We had a wonderful time, with lots of good food devoured and new memories made! I am glad to be home and back in the "normal," however - so that I can spend some time crafting!

Our vacation was HOT - record temps in Boston - and back home we have had heat indexes over 100 every day. I am finally ready to move from the hot to the crisp fall air, so bring it on! I am hoping my breezy sunflower card will help do the trick! We saw a lot of beautiful flower gardens on our trip, and some amazing sunflowers.

 
One of the things I sometimes struggle with is scoring my card in half. Simple, right? Especially when you have a Scor-Buddy! I think it's age creeping up saying, "You used to be able to do this, but now you need help!" So I use my Original MISTI after I have scored the halfway mark, and put the cardstock in the corner to fold in half and get it straight! The Cut Align also helps to get those layers straight (along with some magnifying readers!), and I had a few layers here!


I am using the wonderful Sunflowers Dies from Stampin' Up!, along with a fun sentiment (Big Words) from WOW! Embossing (yes, they have stamps!). I have a subtle embossing folder (SU!) for my main white panel to add texture to the background, along with some fun patterned paper from Simple Stories that reminded me of sunflowers. I used my Mini MISTI to stamp the sentiment in a crisp black (VersaFine Clair Nocturne). The leaves and foliage sprigs, as well as the sunflower center are cut from shimmer cardstock (Michael's). A fun fall card for a friend to say hello!

And here is my inspiration from Maine, near Acadia National Park. These were about 8 feet tall:

Have a great week! You can find more of my projects at Joy in a JAR.
 

Tuesday, September 7, 2021

So Blessed


Hello Friends!
It's Ceal here for team Tuesday. 
Today's card uses this gorgeous set by Concord & 9th and their new liquid watercolors. 

To create this card I started with a white top folding card base and a watercolor paper panel. I placed the watercolor paper in the Original MISTI and stamped the image several times with Fadeout ink. I love being able to get a great impression on watercolor paper by using the MISTI. It is a necessity when using watercolor paper because of the texture.
I used the new liquid watercolors to color the image and then placed the panel back in the MISTI to stamp the sentiment 


Thursday, September 2, 2021

Watercolor and the MISTI

 Hello!  It's Angie here today!  All this week I have been creating with watercolor and my favorite tools! 

To create my card, I placed the Lotus Flower 3 in the Original MISTI and inked it with Shadow ink.  Truthfully, I meant to use Fade Out ink but picked up the wrong ink; turns out I really like the way it looks! Without moving the stamp, I simply flipped the watercolor paper around and stamped again!  For the flower petals, I mixed Daniel Smith's Jane's Grey, and Indigo.  I chose Enduring Comfort for my sentiment because I was talking with a friend this week who was making sympathy cards.  I realized that I don't have any in my stash and it's always easier for me to create a sympathy card when I don't need one!

When I make cards, I like to adhere the cardstock (or watercolor paper in this case) to the base before stamping the sentiment. This helps ensure that the sentiment goes on straight even if I get the layers adhered imperfectly. The Cut-Align ruler with its center zero also helps to align the layers evenly on the base.  Next, I place the card into the Mini MISTI and stamp the sentiments.  The Mini takes up less space and is lighter so it's very handy to use and that means I am able to leave my image on the Original MISTI until I am completely done with my project.  It happens quite often that I need to start my project over again and if the image is still in the MISTI it's a wonderful time saver!  The last thing I do is add a Double Dip note on the inside especially if it's a dark card base.  

Thanks so much for stopping by!  

Angie


**Affiliate links used when possible at no cost to you!**