Friday, July 29, 2022

Just Keep Swimming


Hello there!  Long time since I have posted a card.  Have you missed me.  Little Petunia and I have been settling into our new home in Texas.  My craft room is pretty much stocked.  I have been busy making swatches.  I find it is easier to make cards when I know what my choices are.  I love organization.

 I tried this card with white cardstock and prefered the kraft cardstock.  Here is the video that shows how I made it.  Be sure to leave me a comment, otherwise I won't know if you still like my cards.


Affiliate links to supplies used:


Tuesday, July 26, 2022

MISTI and Zebra Doodling


Hello and welcome to my blog. Today is a busy day for me as I am posting for My Sweet Petunia and as a guest designer for the Ink Blot Shop. Today I am using the Zebra Background, Billy Silly Goats  and Hey You Giant Stencil from the Ink Blot Shop. 

Using my standard MISTI and the sticky pad, I placed the Zebra Background stamp on the MISTI window. I inked it up with a light grey ink as if I were going to no-line color this. Instead, I used my fine tipped fountain pen with black ink and doodled over the stamped lines. I thought this would provide a different look to a solid black or solid grey background. 

To make the Hey You pop, I stenciled it with Gina K Designs Glitz in black. I then cut out each letter of HEY so I could mount them separately. I just liked that look better than a rectangle of the entire word. I then stamped the sentiment strip using a sentiment from Silly Billy Goats. I matted the strip with black card stock and popped it up with 3M Foam tape and offset it from the HEY. 

I cut down my main panel to 4" x 5.25" and mounted that on black card stock. I adhered the full panel to an A2 sized card cut from Neenah Solar White 110 lb card stock. 

The doodling was really relaxing so give it a try with solid stamps or solid background stamps.

Thanks for stopping by;
Susan

Products Used: I am used compensated affiliate links at no further cost to you.

My Sweet Petunia Shop
MIS-T

Ink Blot Shop

Zebra Print Background

Billy Silly Goats

Giant Hey You Stencil


Thursday, July 14, 2022

Keep On Swimming!

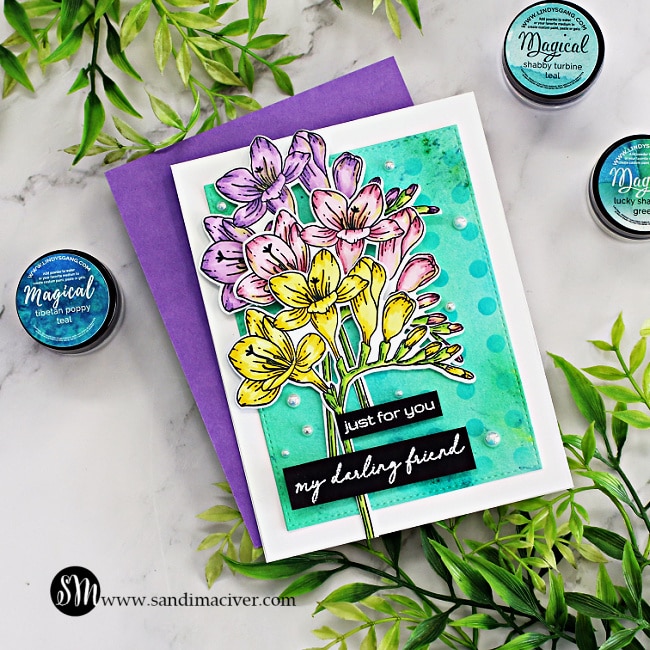
Hi, I am thrilled to share a fun card on the My Sweet Petunia blog today! 

I created this summery underwater card by first inking a 6x6 background stamp in three shades of blue ink. With background stamps, I like to use the Sticky Mat to hold the cardstock in place about a 1/8th of an inch from the inside edge of the MISTI.  This allows for a complete image plus the image can be stamped multiple times without fear of the paper moving.  For me, a MISTI is a must when using background stamps for complete inked perfection!

Next, I placed all of the images on the MISTI lid and stamped them at one time. 
 I left the underwater stamps on the New Original MISTI until I was completely done with the project in case I needed to restamp something.   Lastly, I stamped the sentiment directly on the card front with the Mini MISTI.

One more tool to mention is the Cut-Align Ruler.  I use the ruler every time I stamp.  For this card, I used the 0-center marking to make certain that the circle die was in the center of the panel.  I especially love the weight of these rulers along with the fact that it comes in two sizes. 


I hope you are having an amazing summer!  Thanks for stopping by today!

**Affiliate Links are used when possible with no added cost to you.  I appreciate your kind support**

My Sweet Petunia Shop


Misc Products


Tuesday, July 12, 2022

Christmas in July


(when possible Affiliate links are used in the post  at no cost to you) 

Hello Friends! 
Welcome to another Team Tuesday post!  
I have been on a Christmas card kick since so many of the challenges in July are Christmas . This is a good thing for me because it helps me build my stash. I make Christmas cards to give to the local rehab/nursing home so I usually need about 200. 
Today's card uses a stamp/stencil combo by Taylored Expressions. 
To make this card I started with a white top folding card base, a kraft panel and white cardstock for the scalloped frame. I placed a sticky mat in the Original MISTI and then placed my kraft panel down in the middle and stamped the background. Next still using the sticky mat I placed the stencil over the panel in the proper alignment for the poinsettias. To give the card some interest I added some accents using a white gel pen. To finish it I added the embossed greeting and the white scalloped frame. 

Below you will find links to the products used. Click the picture to start shopping. Compensated Affiliate links are used at no additional cost to you. Your support helps me to keep bringing you new projects and I appreciate that so much!  

Thank you! 


Tuesday, July 5, 2022

Studio Katia Darling Freesia


Hi card making friends.  It's Sandi here and today I have two cards to share with you created with the Studio Katia Darling Freesia stamp set.

This is a great stamp and die set and lends itself perfectly to stamping and copic coloring.

 handmade greeting cards with copic colored florals created with new card making supplies from Studio Katia

Studio Katia Darling Freesia Copic Markers Used:

I used three markers for each color, a light medium and dark:
Pinks:  R81, 83, 85
Purple:  V12, 15, 17
Yellow:  Y11, 15, 19
Green:  YG21, 23, 17

For both cards, I used the Misti to first stamp the image onto Hammermill White card stock with Memento Black Ink.

Next, add the shadows in the image with the darkest copic color, then the medium and blend the colors together with the light.  I do have a few videos over on my YouTube Channel showing how I like to color.


handmade slimline card with freesia and a powdered background using card making supplies from Studio Katia for the YouTube Hop and Give Aways

Studio Katia Darling Freesia Slimline Card

Start by coloring the images and cut them out with the coordinating die.
Next, use the Studio Katia Dotted Slimline die set to cut the scalloped card front and to make a stencil.
Create a background with the Lindy's Magicals in Lucky Shamrock Green, Tibetan Poppy Teal and Shabby Turbine Teal.

TIP - I use the Misti Sticky Mats to hold my watercolor paper when I'm playing with these powders.  It keeps my paper flat and gives me something to hold onto to pick up and move the color around.

Finally, once the background is dry, cover it with the stencil and use a blending brush to add Peacock Blue Distress Oxide Ink to the panel.
Attach to a white card base and add a sentiment white heat embossed on black cardstock.


handmade greeting card with copic colored Freeshia and a Lindy's Magicals Powders background using card making supplies from Studio Katia

Studio Katia Darling Freesia A2 Card

The steps are the same for the second A2 card except for the size of course and the layout of the flowers.  I used a stitched edge die to cut out the card front just to add a bit more interest.
Both cards are embellished with Studio Katia Marshmallow pearls.  
 

Card Making Supplies used for the Studio Katia Darling Freesia Cards:

Here are the products I used today.  Compensated affiliate links used  where available at no cost to you. Clicking on a thumbnail link and shopping supports my website and allows me to continue bringing you new projects and videos. 

 Thank you for your support.  Affiliate and product disclosure are found on my disclosure page.  All products were personally purchased except for Studio Katia Stamp and Die sets used today which were provided/sponsored by the company.  

As always, I was not paid to do this post.  I only use and recommend products I love.  Click on the icons below each product picture to go to my favorite stores.