Wednesday, January 10, 2024

Bird Tags


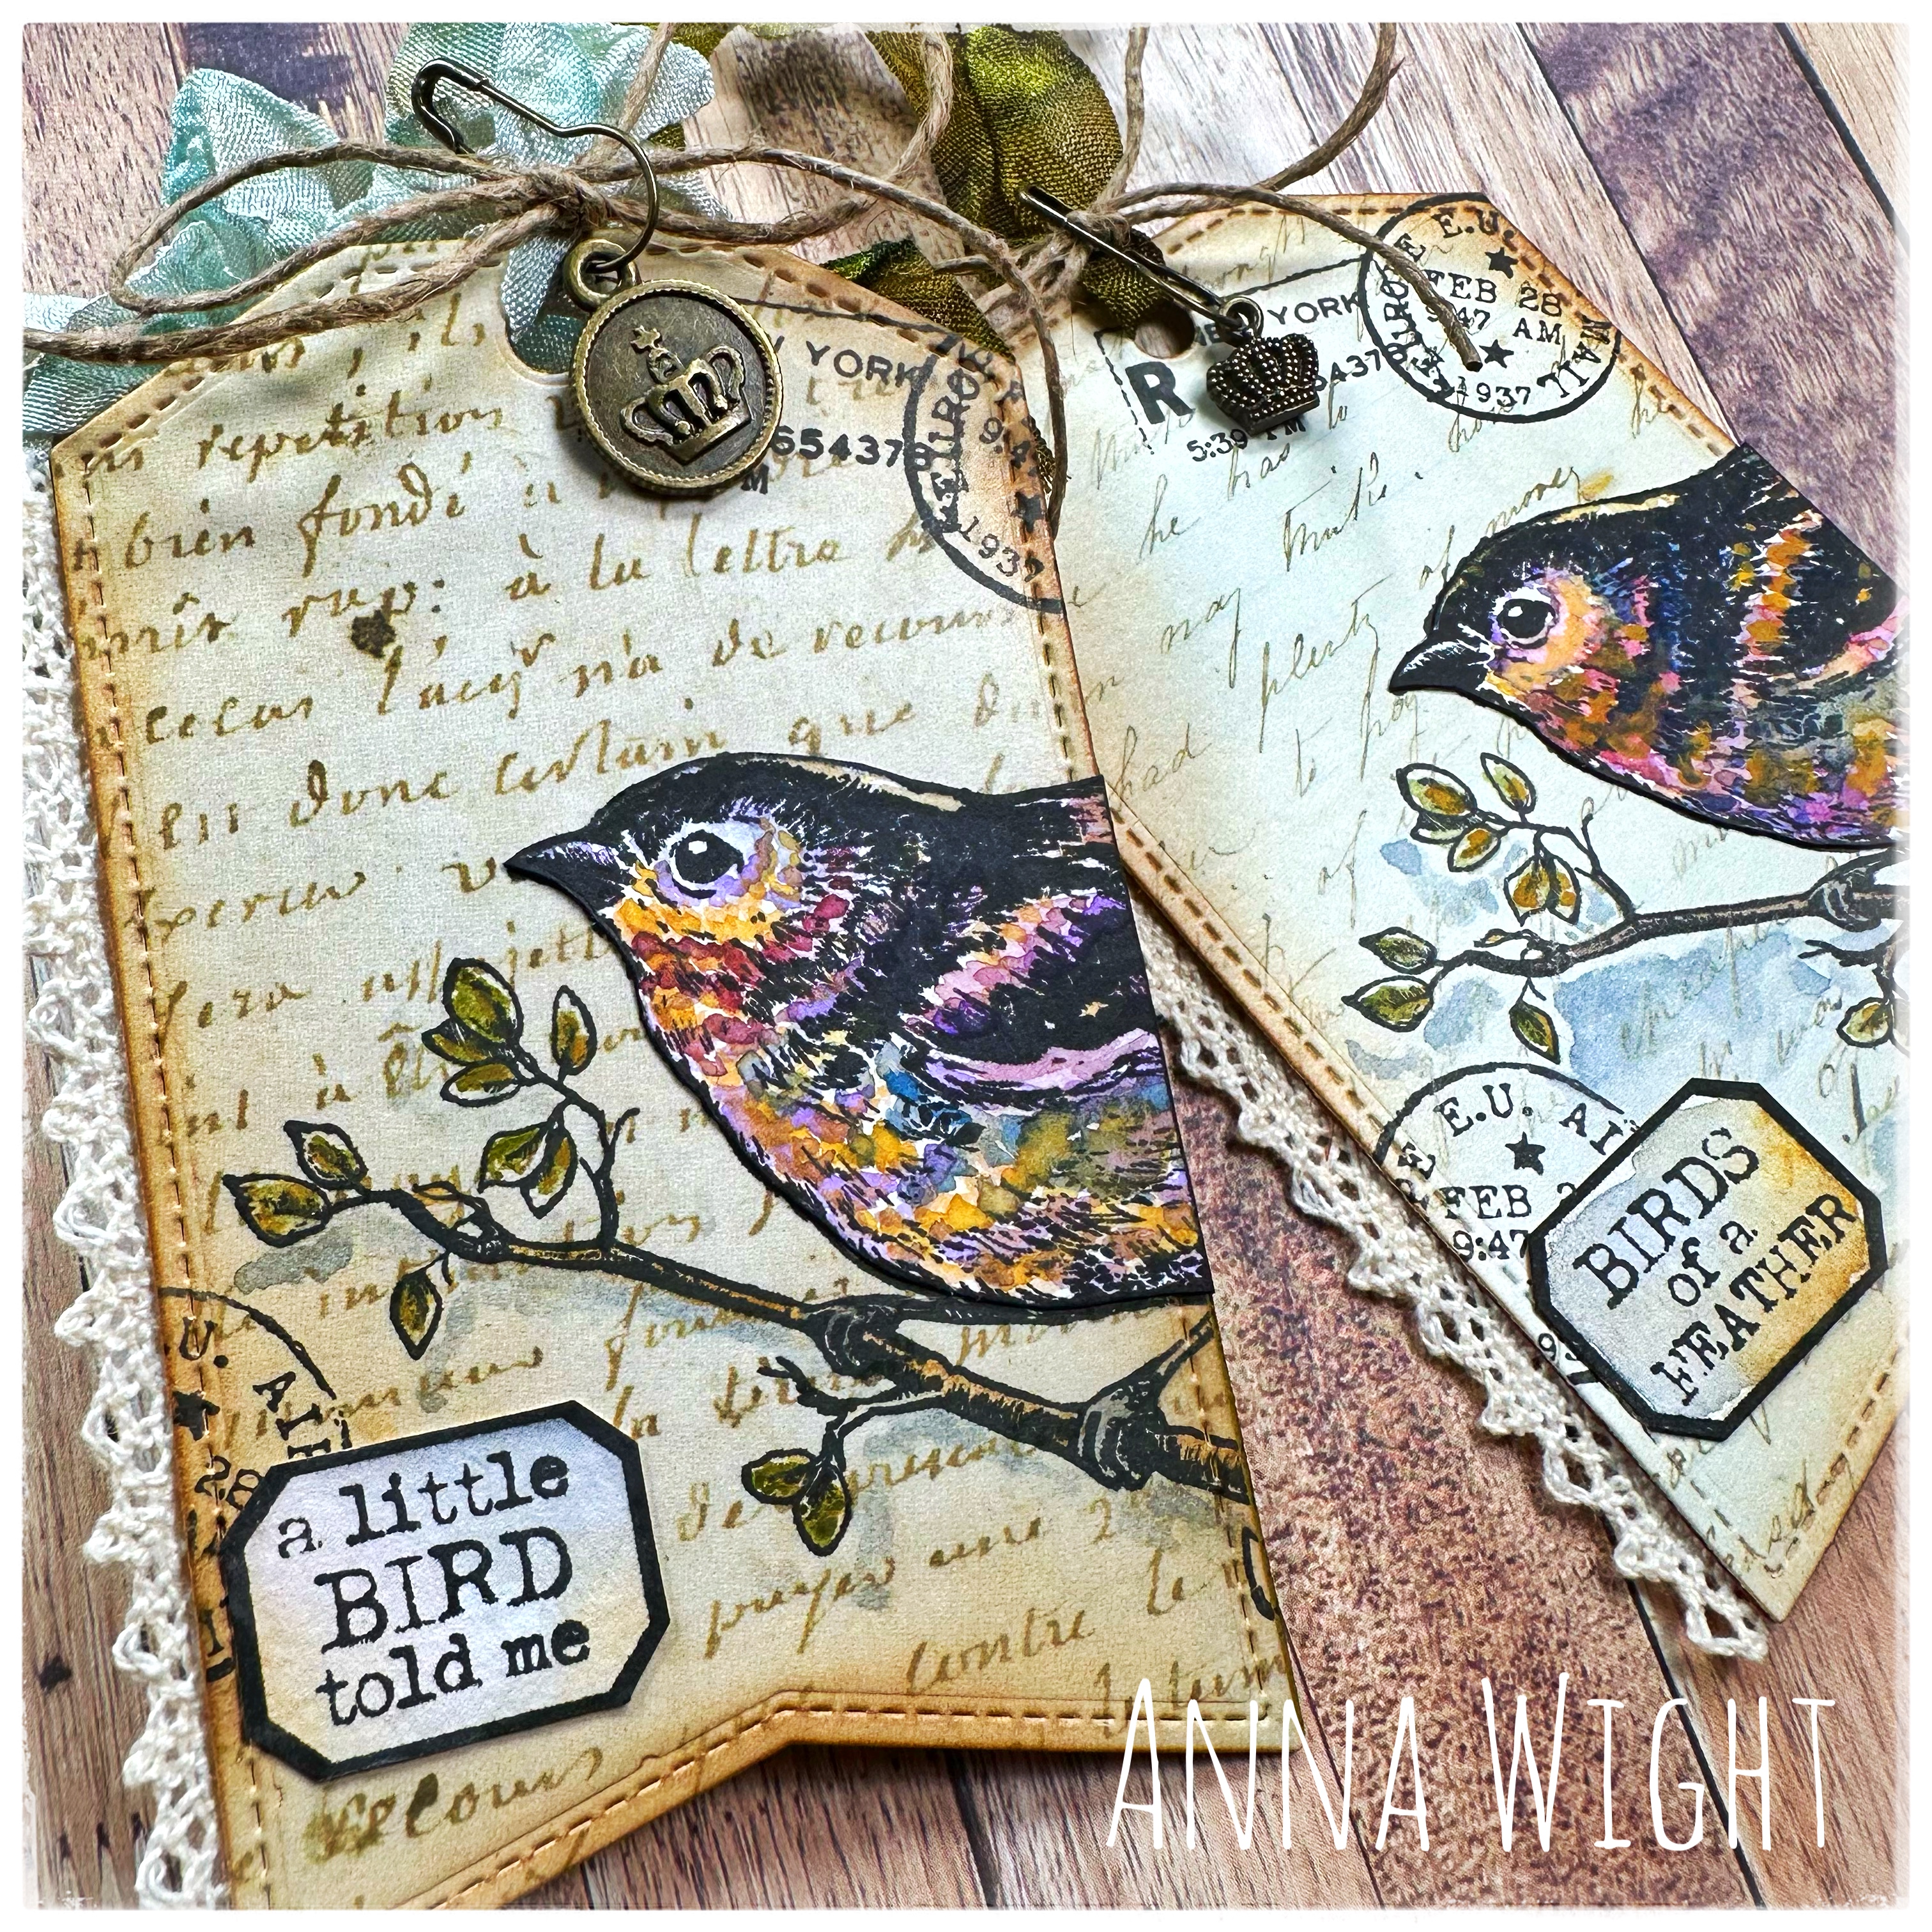
 Hello everyone! Anna here, with greetings from a cold and snowy pacific northwest! The tag I’m sharing today was made using stamps from REDlead Paper Works, as well as the Vintage Letters 6x6 paper and Stitched Tag from Impression Obsession. Here’s a quick and easy way to create beautiful tags, using a bit of fussy cutting and “magic”!

I love how the Mini MISTI allows me to stamp a sentiment or image several times, giving me the perfect placement and impression for every project! 

I created a video showing how I made this tag, and demonstrate how the Mini Misti is such a valuable tool when stamping on watercolor paper. Check it out!


Thanks so much for joining me on the blog today!

Tuesday, December 26, 2023

Team Tuesday with Ceal and Alex Syberia

(Our team uses affiliate links)


Hello crafty friends!
It's Ceal here with you today for Team Tuesday.  I hope everyone that celebrates it had a great Christmas. 
Today I am sharing a card made with the Alex Syberia Designs poinsettia stamp. I have had this stamp for a couple months now but never had the time to ink it up until now. 

To make this card, I started with a white top folding A2 card base, a white panel and another white panel for the image. I placed the poinsettia stamp in the Original Misti to make sure I get a good impression and stamped it with black ink.  I colored the image with OLO markers and added some details with a white gel pen, then cut it out with the coordinating die. 
I used a cover plate from Pinkfresh Studio for the background. 
To finish the card, I added a greeting embossed with gold powder also by Pinkfresh Studio.


I have linked all products below.


Wednesday, December 20, 2023

Season’s Greetings


Hello everyone! Anna here, with greetings from the pacific northwest! The card I’m sharing today was made using the limited edition set for December 2023 from Impression Obsession. It is a beautiful set with several winter scenes and sentiments that will make not only beautiful holiday cards, but are perfect for winter cards well after the holiday season.

I love how the Mini MISTI allows me to stamp a sentiment or image several times, giving me the perfect placement and impression for every project! 

I created a video showing how I made similar cards, and demonstrate how the Mini Misti is such a valuable tool when stamping on watercolor paper. Check it out!


Thanks so much for joining me on the blog today!

Tuesday, December 19, 2023

Fun Shape Shaker Christmas Card

Today I am excited to share this fun shape shaker Christmas card. This card was so much fun to create and of course using the Mini MISTI and the Precision Glue Press made it so much easier. 

I created this card using the Pine and Berry Centerpiece stamp set from Honey Bee Stamps. On Thursday 12/21 I will have a video on my YouTube channel sharing how I created this card.


I hope you enjoyed this fun card and give a shape shaker card a try.

Here's my supply list:

Thursday, November 30, 2023

MISTI in Teal and Thankful for YOU!

***Our Team Uses Affiliate Links at No Charge To You***

Hello, friends! Angie here featuring this beautiful Hero Arts bunny. My love for bunny images has snuck up on me, and now I have difficulty passing up any cute bunny stamp!  

When I make backgrounds to die-cut shapes from them, I keep them even if only small scraps are left. Recently, I made large, brilliant watercolor powder leaves from a background piece. I saved the scraps even though the leftovers were small. Today, I carefully laid the stamp over sections of the watercolor powder scraps and had just enough to stamp and die-cut three sets of leaves and a pine cone! The MISTI and a Sticky Mat were invaluable for keeping the scraps in place for multiple stampings on the textured paper. The mini MISTI was also a lifesaver for precision stamping on the long sentiment. (do you know, the mini now comes in Teal?, yes it does and I have linked right to it) I used the Cut Align and the Alignment Grid to ensure everything was straight! I also used the Precision Glue Press to adhere all the pieces to the card base.    

Thanks so much for stopping by, I am thankful for you!  


Wednesday, November 29, 2023

Chocolate Chips in My Cookie


Hello everyone! Anna here, with greetings from the pacific northwest! The tag I’m sharing today was made using recently released dies and stamps from Impression Obsession. Adorable cookie themed dies were released along with stamp sets filled with cute cookie and holiday themed sentiments perfect for making cards and tags.  

I love how the Mini MISTI allows me to stamp a sentiment several times, giving me the perfect placement and impression for every project! 

Thanks so much for joining me on the blog today!

Tuesday, November 28, 2023

Team Tuesday With Sweet 'n Sassy Stamps

 Our team uses affiliate links 


Hello friends!

It's Ceal, here. Today I am sharing a couple cards using the MISTI with a couple sets by Sweet 'n Sassy stamps. 

To make these cards, I started with white top folding A2 card bases. For the top card, I placed a piece of wheat cardstock in the Original MISTI on a sticky mat to stamp the background. Anytime I use a background stamp I always use a sticky mat so I can place it in the middle of the Misti.  Next I stamped and colored the images from the Botanical Collages set and then used postage dies to cut them out. The moment I saw this set I knew I wanted to use the postage dies with it. 


For the second card I placed a white panel in the Original Misti and stamped all of the images on the anel and used a large postage die to cut it down. I added some distress ink and some gold Hero Wax for a mixed media vintage look. 

All supplies are below using affiliate links