Showing posts with label Reverse confetti. Show all posts

Tuesday, September 20, 2022

MISTI Rescues a Dry Ink Pad


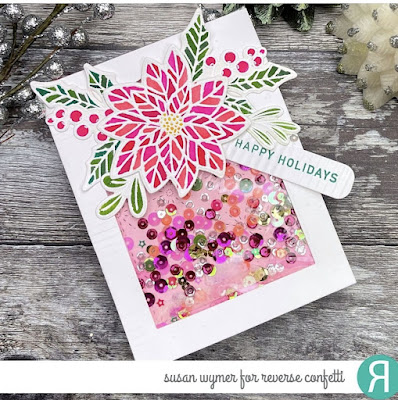
Hello and welcome to Team Tuesdays! My card today features my MISTI along with my Karin Markers. I loaded the stamps from RevProerse Confetti Poinsettia onto the MISTI door and triple stamped them with Versamark Ink onto Canson XL watercolor. Why did I have to stamp three times onto a relatively smooth paper? Because I let my Versamark Ink pad dry out and there was no reinker here at home. In fact, I had two dry Versamark pads. However, I was able to overcome this by using my MISTI. The stamps were aligned on the door already and the sticky pad and magnets were holding the paper. It was easy to "ink up" the stamps three times so that I could heat emboss the images with white embossing powder.

Once this was done, I used my Karin markers to color in the poinsettia and the holly leaves and berries. I also stamped Happy Holidays from Joyful Holiday Wishes. With the MISTI I was able to stamp on paper that been through my paper crimper. The sentiment came out quite crisp despite the crimped paper.  Almost anything can be done with the MISTI!

Thanks for stopping by;

Susan

Products Used: I am using compensated affiliate links at no further cost to you.
My Sweet Petunia Shop

Standard MISTI

Sticky Pad

MIS_T 

Creative Corners

Reverse Confetti

Poinsettia

Stitched Burst Cover Panel Confetti Cut

Joyful Holiday Wishes

Tuesday, October 19, 2021

Using My MISTI to Build Scenes


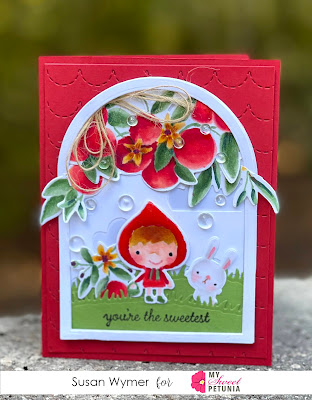
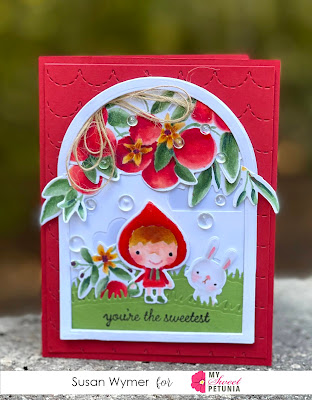
Hi, Welcome to the My Sweet Petunia blog. I am Susan. Today, I have a card that I made for my oldest granddaughter who is doing so well in first grade! I had not colored in a person/fairy in a long time and decided to give it a go with Reverse Confetti's Enchanted Garden. I also decided to color in some apples using Reverse Confetti's Orange Blossom set. 

I set up all the stamps I was using in the MISTI along with some Neenah Solar White Super Smooth 80 lb card stock. This card stock can handle a ton of ink so I have switched to using this type of Neenah rather than the straight 80 lb card stock. I stamped each image twice with Ink On 3 Fade Out Ink. I adore this ink. Even though I have to stamp twice in order for my old eyes to see the lines, the stamped lines fade out as I color. 

For the reds, I varied up the colors but pretty much used Copic Sketch Markers R12, R14, R17, R24 and R29. For greens, I used YG61, G24, YG63 and YG67. The yellows sadly I did not write these down. For the very darkest centers and tiny buds I used RV99. 

For the background, I die cut a panel with Reverse Confetti Cloudy Day cover plate. I then die cut this with one of the Nested Dome die set from Waffle Flower. To make this panel I die cut a piece of Gina K. Designs Soft Stone (perfect shade of gray) card stock to adhere to the background. 


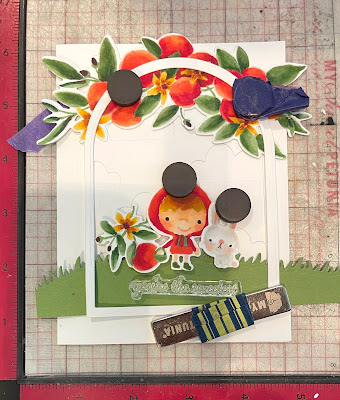
Once I had all my pieces colored and die cut, I place the card base in my MISTI (see above - please excuse how dirty and well-loved my MISTI is) and arranged my pieces. Let's be honest the picture above is an honest picture of crafting except I edited out my messy desk! Using some magnets I finalized this version of the card. I do this instead of using Press N' Seal because I feel that I have better control over placement. Once I have the piece in place I adhere it with liquid glue or tape runner. However, as I was doing this I changed my mind, of course. Once I had moved everything where I wanted it now on the dome, I used liquid adhesive to adhere everything. 

For the back panel that the dome is mounted on, I used Reverse Confetti Stitched Scallops Coverplate to die cut a piece of Reverse Confetti Salsa card stock. I trimmed this to 4" x 5.25". For the card base, I also used Reverse Confetti Salsa card stock to make an A2 side folding card. Once everything was altogether, I added Pretty Pink Posh Dew Drops and some Glossy Accents over Wink of Stella clear glitter ink. 


Thanks for stopping by;

Susan

Products Used: I am using compensated affiliate links at no further cost to you.


Tuesday, September 21, 2021

Critters, Flowers and A Slim Line Card


 Hello Everyone!

This is Susan and I hope all is well at you. I am just finishing up some cards for my grandchildren and then yes, I am going to start on Christmas cards. This card is for one of my grandsons. He turned 3! He likes to climb so I decided to use the tall slimline style for my layout. 

Using a stencil and embossing paste, I layered some bricks onto a piece of Neenah 110 card stock cut to 3.5" x 9". While that was drying, I got out my MISTI and I stamped out several pieces from Reverse Confetti Cup of Friendship, Lemonade Stand, Ice Cream Social and Later Alligator onto Neenah Solar White 80lb Super Smooth card stock. I then used soooo many different colors of Copics markers to color these flowers and critters. 

I die cut Happy Confetti Cuts from Neenah Solar White and Reverse Confetti Avocado card stock. I did layer the word Happy 3x using liquid adhesive. Once I had all the pieces gathered and finished, I used my regular sized 2nd Edition MISTI and my Creative Corners to line everything up. I use the magnets like other crafters use temporary adhesive or Press N'Seal. For me this method works best as I can move things around more easily. I highly recommend purchasing the Creative Corners. I love mine and use them every day I craft. For a finishing touch, I added clear droplets. 

Thanks for stopping by and get that MISTI out;

Susan

Products Used: I am using compensated affiliate links at no further cost to you. I make a small commission on the products used in the links below.


Tuesday, June 1, 2021

MISTI and Reverse Confetti: Slimline Corgis


Hello and welcome to Team Tuesdays! This is Susan up on the blog. Today's card was inspired by my youngest granddaughter's love of dogs aka "daws". Her first stuffed animal "daw" was a Corgi so I had to use Reverse Confetti's Corgi Cuties and the Fold Over Tag windows.

Using my MISTI, I stamped the Corgi images with Memento Tuxedo Black which is safe for Copic Coloring. I then used E31, E33 and E35 with a touch of E39 for the brown fur. For the white fur, I used W00, W1 and a bit of W2. To add a bit of pink here and there I used R30. I used the accompanying Confetti Cuts to cut out each little image.

I then die cut 3 tags using a sheet of Neenah Solar White 110lb card stock. Again using my MISTI and Little Piggy ink from W Plus 9 Designs, I stamped a sentiment/image on each tag. To make sure the sentiments would all be level with one another, I lined up the tags on the MISTI using magnets and checked the level with one of my Creative Corners. Then I taped each tag shut. I very carefully added dry adhesive to each Corgi and placed them in the window of the tag. 

The final card is a Slim Line card and is cut to 3.5" x 9". I trimmed the pink polka patterened paper to 3.25" x 8.75". I used my L shaped Creative Corner to line the tags up before adhering them with foam tape. I really had a lot of fun making this card because I can see my granddaughter playing with her Corgi in my head. So happy! 

Thanks for stopping by;

Susan

Products Used:  I am using compensated affiliate links at no further cost to you! Thank you! 

Tuesday, May 4, 2021

MISTI How I Love Thee


I honestly cannot craft without my MISTI. From the stamping to arranging of layers and straightening items, I use my MISTI. I most often use my new standard MISTI and my Creative Corners. This card was no exception. 

For this card, I stamped Reverse Confetti's Butterfly Wreath and some extra butterflies onto Arches Cold Press watercolor paper using Versafine Onyx Black ink. Because I used the textured side I had to use the MISTI 3 times to get a good image. I also stamped the sentiment in the same manner. 

I fussy cut everything out because I had not purchased the Confetti Cuts for the wreath. For the back panel I trimmed a pieces of Arches to 3 7/8" x 5". I added some water to the panel and just added drops of color. Honestly, I do not even remember what colors I used. I blended them all together and then splattered Lunar Blue and Indio over the panel. I added some of my favorite Pink Fresh Studios clear drops and a pretied bow. 

Thanks for stopping by and leave a comment telling me your fav use for your MISTI;

Susan

Products Used: I am using compensated affiliate links at no further cost to you. 


Tuesday, March 9, 2021

Using Your MISTI for Stencils


 Hi, Welcome to Team Tuesdays! I had a lot of bits and pieces on my desk so I whipped up this card. However, I had to make a background. I do not like putting Pixie Spray on my stencils as it makes storing the stencils difficult and taping never seems to keep things straight for me. So I thought why not use my MISTI. I have a picture below showing what I did. I do have a Silhouette Cutting Mat in my MISTI and that is sprayed with Pixie Spray. However, what makes this work is the magnetization of the platform.


So here you can see my first stencil not the one that actually made it on the card. My paper is adhered down to the mat and with magnets. I then laid the stencil on top and moved the magnets to adjust for the stencil. This kept everything perfectly aligned and stable. Nothing moved and I had no blobs of ink! So I will be using this from now on for stenciling especially with fine detailed stencils.

Thanks for stopping by;
Susan

Products Used: I am using compensated affiliate links at no further cost to you. I used a number of retired products for which I do not have links. 
Friday, May 22, 2020

MISTI: No Tomorrow

As I am writing this post, I am thinking about how coincidental the title is to today's uncertain situation.  However, I am fully confident that everything is going to be just fine.   So let's move forward and get to today's card.

I won't bore you with the details and just let you enjoy the video.  Obviously, you have no where to go.


Affiliate links to supplies used:

Tuesday, December 17, 2019

Team Tuesday with Channin


Hello friends!! It's Channin here and today I'm sharing a sweet card featuring some adorable products from Reverse Confetti!


First I watercolored an A2 panel of watercolor paper with some liquid watercolors (Cookie Monster, Jelly Donut, Lollipop). Once I finished watercoloring I then stamped several snowflakes in Versamark ink and then heat embossed with opaque iridescent embossing powder. Next, I then stamped the cute hugging mice in Gina K. ink onto white cardstock. I then colored the images in with prismacolor pencils and then die cut with the matching dies. I then hand cut a snow drift from white cardstock and then stamped a sentiment from the set in Versafine Onyx Black ink using the MISTI to help me curve the stamp.


Next, I ink blended with Pinkfresh Studio's Ocean Breeze dye ink along the bottom of the drift and then applied Morning Dew Nuvo Crystal Drops along the top of the snow and added iridescent glitter. I finished the card by adhering the watercolor panel onto an A2 top-folding card base and then adding the snow drift and critters with foam squares.

I hope you enjoyed my card! Thank you so much for stopping by!!

~Channin

Supplies:

Sunday, April 15, 2018

Lift Me Up With MISTI


Do you ever go through phases of the same thing over and over?  I get into food phases all the time.  I go through periods where I have the same snack or dessert everyday.  Not long ago, it was to mandarine oranges for dessert.  Right now my food phase is three to four Oreo Cookies for dessert.


My crafting phase right now are bright colors.  I made this card using the same colors that were on my Geometric Background card.  I am not sure if it is a phase or if I was just too lazy to find another color combination.  Either way, I have a cute card to share.

Check out the video below on how I made this card.  Be sure to leave me a comment on what your phase is, crafting or food.

Thanks for stopping by!


Affiliate links to supplies used:


Original MISTI
[ MSW ]
Original MISTI Mouse Pad
[ MSW ]
Original Grid Paper Pad - DOUBLE SIDED
[ MSW ]
Bar Magnet
[ MSW ]
Novus 1 Plastic Polish
[ MSW ]
Fine Scratch Remover Novus 2
[ MSW ]
Lawn Fawn Stamp Shammy
[ ELH ]
Hero Arts Embossing Gun
[ ELH ]
Inkadinkado Embossing Magic Bag
[ ELH ]
Ranger Embossing Powder, Clear
[ ELH ]
Mini Kolinsablon Spotter Brush - Size...
[ HBL ]
VersaFine Clair Ink Pad, Nocturne -...
[ ELH | SSS ]
Reverse Confetti Clear Stamps, Lift...
[ ELH | SSS ]
Reverse Confetti Cuts LIFT ME UP DIE...
[ SSS ]
Altenew Clear Stamps, Halftone...
[ ELH | SSS ]
Stick It Adhesive Large Sheets, 5pk
[ ELH | SSS ]
Lawn Fawn JET BLACK Premium Ink Pad...
[ SSS ]
Altenew Crisp Dye Ink Pad, Bamboo -...
[ ELH | SSS ]
Simon Says Stamp Premium Dye Ink Pad...
[ SSS ]
Perfect Match Raspberry Fizz -...
[ PPR ]
COPIC Sketch Marker BG15, Aqua -...
[ ELH | SSS ]
COPIC Sketch Marker RV25, Dog Rose...
[ ELH | SSS ]
COPIC Sketch Marker W0, Warm Gray No....
[ ELH | SSS ]
COPIC Sketch Marker Y13, Lemon Yellow...
[ ELH | SSS ]
COPIC Sketch Marker YG21, Anise -...
[ ELH | SSS ]
COPIC Sketch Marker YR20, Yellowish...
[ ELH | SSS ]
COPIC Sketch Marker YR21, Cream -...
[ ELH | SSS ]
COPIC Sketch Marker E13, Light Suntan...
[ ELH | SSS ]
COPIC Sketch Marker E33, Sand
[ ELH | SSS ]
COPIC Sketch Marker E39, Leather -...
[ ELH | SSS ]
Little Things From Lucy's Cards...
[ SSS ]
Pretty Pink Posh Jewels, Watermelon -...
[ ELH | SSS ]
Pretty Pink Posh Jewels, Spring Green...
[ ELH | SSS ]
Little Things From Lucy's Cards LEMON...
[ SSS ]
Amazon.com: Crystal Katana Multimedia...
[ AMZUS | SSS ]
Reverse Confetti Cuts DOUBLE SCALLOP...
[ SSS ]
Foam Tape
[ AMZUS ]
Sakura WHITE MEDIUM POINT Gelly Roll...
[ SSS ]
Sizzix Big Shot White & Gray
[ ELH ]