Showing posts with label #wowembossingpowder. Show all posts

Tuesday, December 29, 2020

Ink Repeating with Karen Reategui


Hi friends! Today I’m sharing this card over My Sweet Petunia Blog. I’m using Layering Flutterbies Stamp & Die Set from Julie Hickey Designs and for my sentiment I have Signature Thinking of You Stamp & Die Set also by Julie Hickey Designs.

For this card I have a mix of a ink repeating technique and blending inks with mini daubers. The sponge from the daubers also gave some texture to the blending which is awesome. The inks used on this card are from Catherine Pooler Designs.


Let’s begin! I started by placing a silhouette of one of the butterflies on an A2 panel. I begun stamping from bottom to top. Then, using a dauber I applied three different inks to the silhouette stamp. The inks from Catherine Pooler Designs that I used are Aquatini, Lime Rickey and Something Borrowed.


I stamped each butterfly silhouette and repeated the process of ink blending each time. Next, I stamped the outline of the corresponding butterfly using white ink.
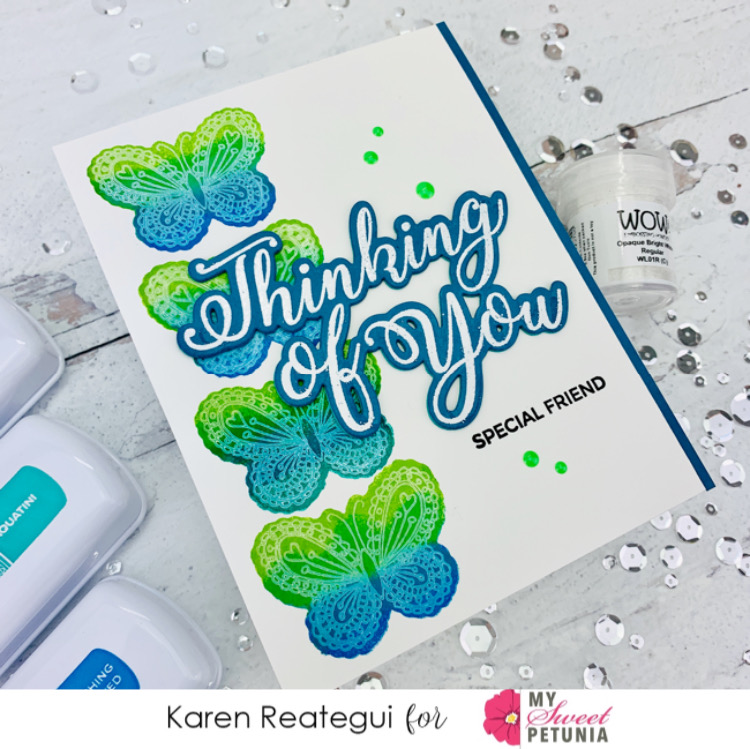


Additionally, I die cut the Signature Thinking of You Die and placed the negative part in the MISTI. I put the die cut inside the negative part and stamped the Signature Thinking of You Stamp and heat embossed it with WOW! Opaque Bright White Embossing Powder.


I die cut the Signature Thinking of You Die two more times and glued them behind the white heat embossed die cut. Next, I stamped the sentiment “Special Friend” from Friendship Flower Stamp set from Julie Hickey Designs.


Finally, I trimmed just a bit one side of this panel and then I added a white folded notecard at the back using glue. Last, I placed the white heat embossed die cut on top of the background and I also adhered a strip of teal cardstock at one side and this card was finished. 

Thank you so much for stopping by and have a fabulous day! 

Your friend,

Karen 

Monday, August 10, 2020

You are Awesome with Karen Reategui


Hello crafty friends! Today I'm stopping by My Sweet Petunia Blog to share this card using my new Original MISTI and stamp and dies from Pinkfresh Studio. For this card, I'll be stamping the layering stamps on the negative die for a perfect line up and placement.


Let’s start! I die cut a white piece of cardstock using the Curvy Floral Vine Die from Pinkfresh Studio and placed the negative piece inside my MISTI to line up my stamps. Additionally, I tucked in another piece of cardstock, or it can be any paper you want, behind the negative piece. Then, I started to line up my first stamp, I held it with the MISTI door, set the die cut piece inside, inked up my stamp and stamped the image. Using your negative piece inside your MISTI helps you achieve a perfect lining up of your layering stamps.


I repeated this process with each layer until the image was ready and I stamped two of these florals. Next, I die cut another piece of white cardstock using the Braided Tag Dies. I arranged the florals on top of this Braided Tag using glue along with lilac leaves that I die cut using the Leafy Branch Die.


I also die cut YOU ARE AWESOME from the Phrase Builder: You Dies out of purple cardstock, including a shadow out of vellum for the awesome word. I adhered this phrase on top of the Braided Tag and between the florals using glue and my background was almost done.


For my next step, I put a white panel inside my MISTI and the Diamond Tiles Cling Stamp. I stamped the Diamond Tiles with WOW! Embossing Pad and heat embossed it using WOW! Hydrangea Embossing Powder. This color of embossing powder has a beautiful soft color that I thought would match the colors in my card. A white folded note card was also adhered at the back using glue.


Finally, I adhered the Braided Tag on top of the Diamond Tile stamped panel using foam tape, added a few jewels around and this card was finished. I hope you liked this card and with the help of your MISTI you can even mass produce this type of cards. You can find the new MISTI here. Have a fabulous week and stay safe!

Karen


Friday, July 17, 2020

Thankful Card with Karen Reategui


Hello friends! Today I’m sharing this card over My Sweet Petunia Blog. I’m using my Original and Mini MISTI along with Pinkfresh Studios stamp and dies.


Let’s start! With the help of my MISTI I stamped the Celebrate Us Stamp Set using Pale Mauve, Amethyst and Parrot inks from Altenew. The outline part was heat embossed with WOW! Metallic Gold Embossing Powder and then I die cut both flowers using the matching dies. You can see the process in the picture below. I simply rotated my cardstock inside the MISTI to stamp both images.


Next, I die cut twice the Leafy Branch Die from Pinkfresh Studio out of gold foil mirror cardstock.


I also die cut the two larger pieces of the Ornate Banner Dies out of white cardstock. I left the larger piece white and on top of the smaller I white heat embossed the outline of the flowers again and then applied Fresh Lemon ink from Altenew using a Life Changing Blender Brush.


Then, I embossed a teal cardstock using the Pretty Frames 2 from Pinkfresh Studios. I adhered a white folded note card at the back using glue.


On top I placed the white frame from the Ornate Banner using foam tape and the part with the heat emboss resist technique was added inside.


Finally, I arranged the flowers and leaves and added a thankful sentiment that was die cut three times out of white cardstock and glued one on top of each one to create a die cut stacked and get more dimension. Some jewels were added also and my card was finished.

Thank you so much for stopping by and have a great weekend!

Karen


Thursday, June 25, 2020

Fabulous Card with Karen Reategui


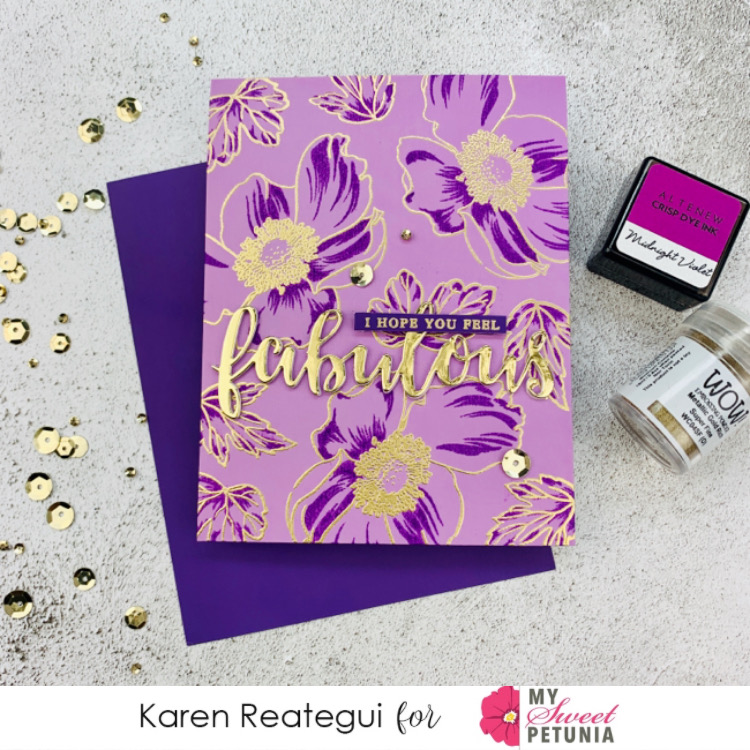
Hello friends! Today I made this card for My Sweet Petunia Blog and I’m using a Build a Flower Anemone Stamp Set and Script Word 2 from Altenew.


Let’s start! I gold heat embossed the outline layer of these flower and leaves using WOW! Metallic Gold Embossing Powder. In order to stamp the 3 images at once I used my MISTI just like you will see in the next picture, this way you gain time and in case you didn’t have a good impression, you can always stamp again with your MISTI.


Once all my images were stamped I gold heat embossed them. By the way, I’m using a colored cardstock Lavender Fields from Altenew for this card. Next, I stamped the detailed part for the flower and leaves using Altenew Midnight Violet ink. I achieved this with the help of my MISTI, positioning and stamping all 3 stamps at once until I completed my panel. See picture below.


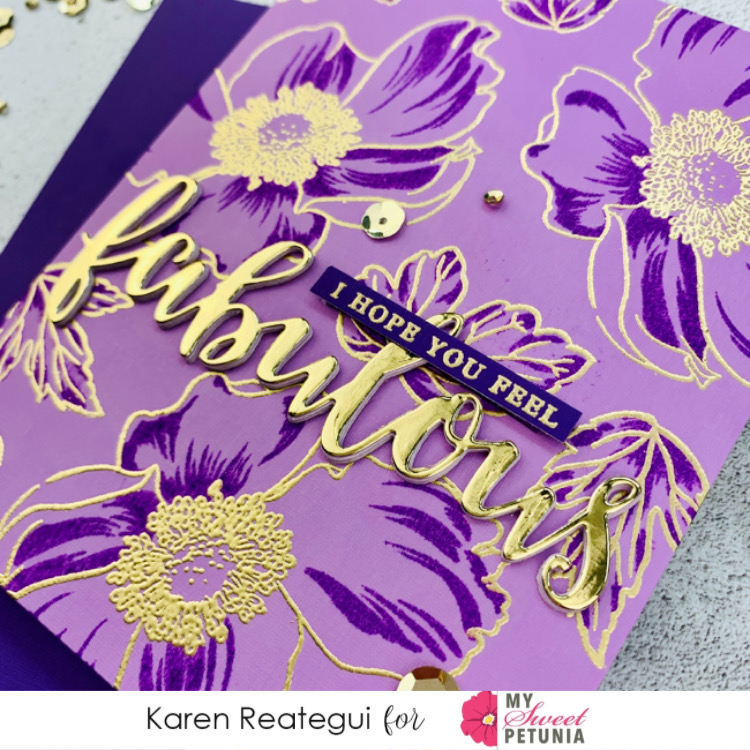
After stamping all the detailed images, I die cut the Fabulous word die out of gold cardstock and to get more dimension I die cut four more times the same die but this time using Deep Iris cardstock.


I added a white note card at the back of my background and then I adhered as well the stack of die cuts that I glued one on top of each other.


Finally, I stamped the sentiment using my MISTI with gold embossing powder over Midnight Violet cardstock and placed it on top of the fabulous word. As the final touch I added a few Antique Gold sequins and my card is finished. Thank you so much for stopping by and have a fabulous day!

Karen


Thursday, June 4, 2020

Ink Smooshing with the MISTI door


Hello friends! Today I’m up at MISTI blog sharing my first post with this fun and easy card using the ink smooshing technique but instead of using an acrylic block I will use the MISTI door to apply the Distress Oxide inks.


Let’s begin! I placed a watercolor panel inside the MISTI and I smooshed Cracked Pistachio Distress Oxide ink onto the MISTI door, sprayed water and then I closed the door to apply the color. I repeated these steps using Broken China and Faded Jeans Distress Oxide inks and let my panel dry. For a final touch I added splashes of gold metallic ink from Hero Arts.


Once the panel was dry I placed on top the Mega Hello Die from Altenew and run it through my die cutting machine. I saved the Hello die cut for another project and I adhered a white card base at the back of my negative panel. Additionally, I die cut one more Hello die cut out of white cardstock and heat embossed it with WOW! Metallic Gold Sparkle Embossing Glitter.


I glued the heat embossed Hello to the background and also stamped and heat embossed the sentiment onto white cardstock using WOW! Metallic Gold Embossing Powder. I added my sentiment on top of the card, a few gold sequins and my card was finished. I really hope you like this card and try this technique using your MISTI. Have an amazing day!

Karen