Showing posts with label flowers. Show all posts

Thursday, May 4, 2023

Magnificent Multiples with the MISTI

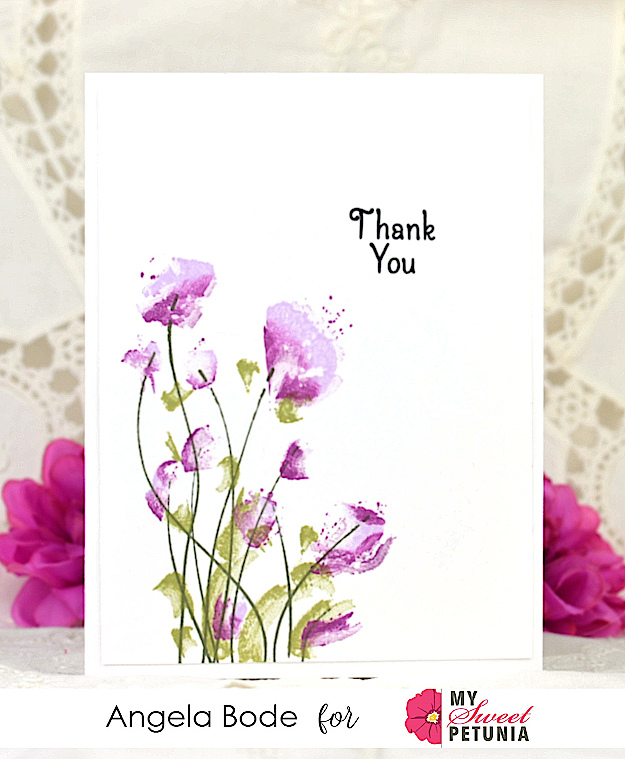
I would not have attempted today's project without a MISTI! It's not that I don't love the stamp set; it's gorgeous! However, I would only have enjoyed building the image with a MISTI since it requires layering to construct the image.  


**Affiliate Links are used when possible at no charge to you!**

I used a Mini MISTI Sticky Mat and placed a piece of cardstock on the mat. I stamped the stems first, picked up the sticky mat with the cardstock, and put it in a Teal Original MISTI. I placed a transparent acetate sheet over the cardstock and set the flower buds where I hoped they would appear on the stems. I inked the stamp and stamped the acetate with the stems on the cardstock showing through. Naturally, the flowers were not aligned perfectly, so I adjusted the stamp as many times as was needed until I felt they were positioned well. I removed the acetate, then stamped the flowers on the cardstock. I moved to a Black Original MISTI and did the same for the broad green brush strokes. I skipped the fourth stamp on these samples but did the same for the fourth stamp in this set on one lone card not pictured here.  

Once the stamps were in the correct place, it was easy to create multiples. Also, instead of using four MISTIs, this could have been done with a Memory MISTI.  The stamps could have been placed in the four corners and stamped the same as mentioned above.  
Thanks for stopping by!  


Thursday, September 2, 2021

Watercolor and the MISTI

 Hello!  It's Angie here today!  All this week I have been creating with watercolor and my favorite tools! 

To create my card, I placed the Lotus Flower 3 in the Original MISTI and inked it with Shadow ink.  Truthfully, I meant to use Fade Out ink but picked up the wrong ink; turns out I really like the way it looks! Without moving the stamp, I simply flipped the watercolor paper around and stamped again!  For the flower petals, I mixed Daniel Smith's Jane's Grey, and Indigo.  I chose Enduring Comfort for my sentiment because I was talking with a friend this week who was making sympathy cards.  I realized that I don't have any in my stash and it's always easier for me to create a sympathy card when I don't need one!

When I make cards, I like to adhere the cardstock (or watercolor paper in this case) to the base before stamping the sentiment. This helps ensure that the sentiment goes on straight even if I get the layers adhered imperfectly. The Cut-Align ruler with its center zero also helps to align the layers evenly on the base.  Next, I place the card into the Mini MISTI and stamp the sentiments.  The Mini takes up less space and is lighter so it's very handy to use and that means I am able to leave my image on the Original MISTI until I am completely done with my project.  It happens quite often that I need to start my project over again and if the image is still in the MISTI it's a wonderful time saver!  The last thing I do is add a Double Dip note on the inside especially if it's a dark card base.  

Thanks so much for stopping by!  

Angie


**Affiliate links used when possible at no cost to you!**


Thursday, May 20, 2021

Sending Smiles

Hello!  Angie here sending you smiles!  
One thing that really makes me smile is creating projects with my MISTI!  I would not want to try to stamp on watercolor paper without a MISTI as this required double stamping to achieve complete ink coverage. I would never have gotten the stamp to match exactly without a MISTI and that would have meant wasted paper and time!
  Once, I stamped the image I used the Misted Watercolor technique.  When using dark cardstock for the card base I like to add a Double Dip Notepaper on the inside.  Not only does it create a nice place to add a sentiment but it lets the recipient know it's ok to pass the card on! Head to the MISTI Shop for MISTIS, fun stamping tools, and more!


If you would like details on the technique I used for this card you can visit me at I Would Rather Be Stamping.  :)  


Tuesday, September 15, 2020

Layered Floral Wreath with Channin


Hello friends! It's Channin here and today a have layered floral card to share. I changed things up a little and combined the beautiful Charming Floral Wreath Stamp Set with a fall palette to give this card a very festive feel!

To create this card I first stamped the floral accents with the Charming Floral Wreath Stamp Set. I started with the leaves and stamped them first in Olive. I then partially inked up the same leaves by holding my ink pad at an angle in Evergreen and then stamped again. I then positioned next the layer, the detail layer for the leaves, and stamped it in Gathered Twigs. 


Next I positioned the base for the flowers and stamped the large flowers in Clementine and then partially in Persimmon. I then inked up the flowers in the middle in Lemon Whip and then partially in Marigold. Lastly I stamped the remaining flowers in Berrylicious and Raspberry Bliss. I then positioned the last layer, the detail layer for the flowers. I then inked up the details for the orange and yellow flowers in Persimmon and stamped it. Next, I inked up the details for the red flowers in Gathered Twigs and stamped. With my floral accents stamped I then die cut them out with the matching dies. 


I then stamped an A2 panel of cream cardstock with the Diamond Tiles cling stamp in Doe. Next, I stamped the sentiment from the Whole Lot of Awesome in Gathered Twigs and then off-set the sentiment and stamped it in Warm Buff. I then adhered the panel onto an A2 top-folding card base and then adhered the floral accents with foam adhesive.

I hope you enjoyed my card!! Thank you so much for stopping by!

~Channin

Supplies: